How To Use & Change Temporary URL with WordPress
When migrating your WordPress website to Bluehost, ensuring that your website remains accessible to your audience is important. Using a temporary URL is an important step in this process. This allows you to test your website's functionality on Bluehost servers before your domain name is fully connected to the new hosting. This article focuses on changing the temporary URLs during your migration. This enables you to test your website before going live with your domain. We will specifically address this topic using WordPress.
- Importance of Temporary URL during Migration
- Scenarios Requiring Adjustment to Temporary URL
- Configure WordPress to use a Temporary URL
- Summary
Importance of Temporary URL during Migration
A temporary URL is essential for several reasons. Here are some of them:
- Check functionality : Confirm that everything on your website, such as plugins and themes, works properly before changing your DNS settings.
- Avoid downtime : You can test your website thoroughly to minimize interruption before updating your domain's name servers.
- Troubleshoot potential issues : Identify and resolve potential issues or errors in a safe, separate staging environment.
Scenarios Requiring Adjustment to Temporary URL
There are a few cases where you might need to adjust your WordPress temporary URL.
- Your DNS records are still updating.
- The domain is not properly connected to your new hosting server.
- You are encountering difficulties accessing your WordPress admin panel.
- The URL structure appears like
http://www.domain.com/addondomain/, and there are no redirects in the .htaccess. - WordPress was installed on an addon domain, where the database URL must be changed to something like
http://www.addondomain.com.
Configure WordPress to use a Temporary URL
There are various ways to configure your WordPress site to use a temporary URL, among them through the WordPress dashboard or phpMyAdmin.
Within the WordPress Dashboard
-
Log in to your Bluehost Account Manager.
-
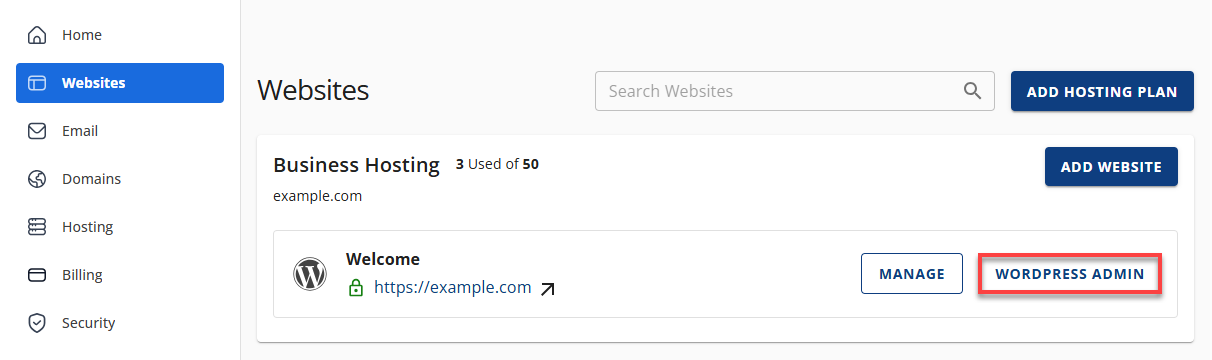
In the left-hand menu, click Websites.
-
Click the WORDPRESS ADMIN button located next to the website you want to manage.
-
The WordPress Dashboard will open when you click the WORDPRESS ADMIN button. There are other ways to login directly into the WordPress Dashboard.
- Additional ways to log in by following this guide: How to Login to WordPress Dashboard.
- Click Settings on the left menu, then select General inside the WordPress Dashboard.

- Under General Settings , update both the WordPress Address (URL) and Site Address (URL) fields with your temporary URL.

- Scroll down and click on Save Changes. Note: Once the migration is done and your domain is pointed to your Bluehost servers, you can go ahead and change your temporary URL back to your domain.
Within phpMyAdmin
If you cannot access your WordPress Admin Dashboard, you can still configure your WordPress site to use the temporary URL through the site's database in phpMyAdmin. Step 1: Identify your WordPress database name Navigate to your site's document root and look for a file named wp-config.php. You can access it through your File Manager or FTP. Or, within your Website Overview welcome page, it automatically arrive to the Overview tab. Further down on the same page are large buttons for quick access you can use to arrive at the same locations you will need PHPMyAdmin and Databases.
An example of what a database name looks like is 'example_database'. Need more help to find the Database? Visit the How to Find Your WordPress Database article for detailed instructions. Step 2: Access your database via phpMyAdmin
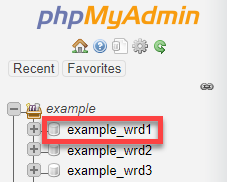
- Navigate to your phpMyAdmin.
- Within phpMyAdmin, click your site's database name in the left pane. The table names will then appear in the right pane.
Step 3: Modify your Home and SiteURL
- On the right pane, click the table name, wp-options. You can also click its Browse link.
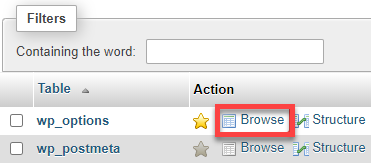
- Look for the siteurl and home under the option_name column.
- Under the option_value column, double-click the siteurl value to make the data in that field editable.
 You can also click Edit (pencil icon) on the siteurl row. (You can do the same on the home row later.)

- In the option_value line, you will see your domain name. Double-click that field and change it to:
**http://box###.temp.domains/~username/**(example).
Note: URL may appear differentlyhttp://sh####.tempdomain..../(example), this depends on the type of account and server.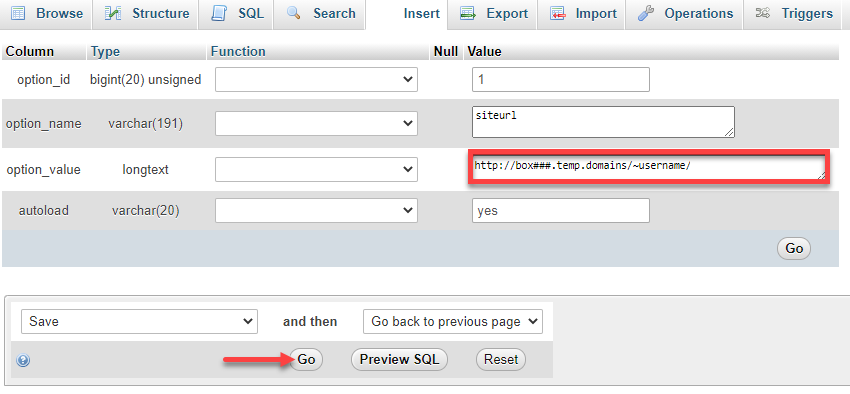 Warning: This step is crucial, so you don't make a mistake. Please take a moment to double-check that the URL you are typing in here is correct, or you won't see any change.
 - Once you've changed the option_value for the siteurl , scroll down and click the Go button to save the changes.
- Next, look for the home row under the option_name column.
- Double-click the value for home under option_value column, or click on Edit (pencil icon) on the left.

- Repeat the process as with the siteurl field earlier and make the same URL change for the home field.
- Once done, scroll down and click the Go button.
Step 4: Check the updates
Visit the temporary URL for your blog http://box###.temp.domains/~username/ (example) to confirm that your website is loading correctly, including the images and content.
Note: Once migration is done and your domain is pointed to your Bluehost servers, you can go ahead and change your temporary URL back to your domain.
Summary
Using a WordPress temporary URL, 'example_database', is important during the migration process to Bluehost. It allows you to thoroughly test your website before going live. This article discusses the importance of using a temporary URL to ensure functionality and minimize downtime on your website. Learn to configure your WordPress site with a temporary URL, both through the WordPress dashboard and directly through your database via phpMyAdmin. This ensures that you can preview and fix possible issues before switching back to your domain, thus maintaining a seamless user experience.