Bluehost Booking and Appointment for WooCommerce
Making bookings and appointments would appear to be a bit of a hassle, but with Bluehost Booking and Appointment for WooCommerce, things have really eased up. Get ready for this incredibly detailed how-to from Bluehost on establishing bookable products and services that go live easily with a super useful plugin. Whether you’re offering rooms, equipment rentals, or professional services, this guide will help you configure your booking system to meet your specific needs, ensuring a smooth and efficient experience for both you and your customers.
- Activate the Following Modules
- Setting Up “People Types” for Your Bookable Products
- Setting up the “Resources” to Assign to Your Bookable Products
- How to Create a Bookable Product
- Booking Settings
- People Settings (Available Only if the “People” Module is Enabled)
- Costs
- Availability
- Resources (Accessible Only if the “Resources” Module is Activated)
- Final Step
- Inserting the Booking Form Into the Bookable Product Page
- Inserting the Booking Form of a Specific Bookable Product Into a Custom Page
- Plugin Options
- Dashboard and Calendar
- Booking Form Options
- Calendar Options
- Customization Options
- Availability Rules
- Price Rules
- Summary
Activate the Following Modules
This includes disabling some features by default in order to make the plugin faster. Here you will find and activate the rest of options from: YITH > Modules.
 For instance, you can activate the People module to create an unlimited number of “people types” and assign specific rules or pricing for each category, such as Adults, Minors, Children, Students, Seniors, Military Veterans, and Members.
Additionally, you can enable the Resources module to generate unlimited “resources” that can be linked to your bookable products, like equipment, staff, technology, or software. You can also activate the Google Calendar module to sync your bookings with your Google Calendar.
Note: The premium version includes additional modules such as Extra Costs and Discounts, Services, and Google Maps. Visit the Get Premium tab to explore all the features available with the premium upgrade.
For instance, you can activate the People module to create an unlimited number of “people types” and assign specific rules or pricing for each category, such as Adults, Minors, Children, Students, Seniors, Military Veterans, and Members.
Additionally, you can enable the Resources module to generate unlimited “resources” that can be linked to your bookable products, like equipment, staff, technology, or software. You can also activate the Google Calendar module to sync your bookings with your Google Calendar.
Note: The premium version includes additional modules such as Extra Costs and Discounts, Services, and Google Maps. Visit the Get Premium tab to explore all the features available with the premium upgrade.
Setting Up “People Types” for Your Bookable Products
Once you activate the People module, you’ll see the People subtab (2) within the plugin’s Configuration tab.
 In this section, you can create as many “people types” as you need. For each type, simply enter the name and, if desired, a brief description.
Click the Add new type button to save the “people type” and have it appear in the table. You can now set up people types for each bookable product. For detailed instructions, refer to the How to Create a Bookable Product section.
Setting up the “Resources” to Assign to Your Bookable Products
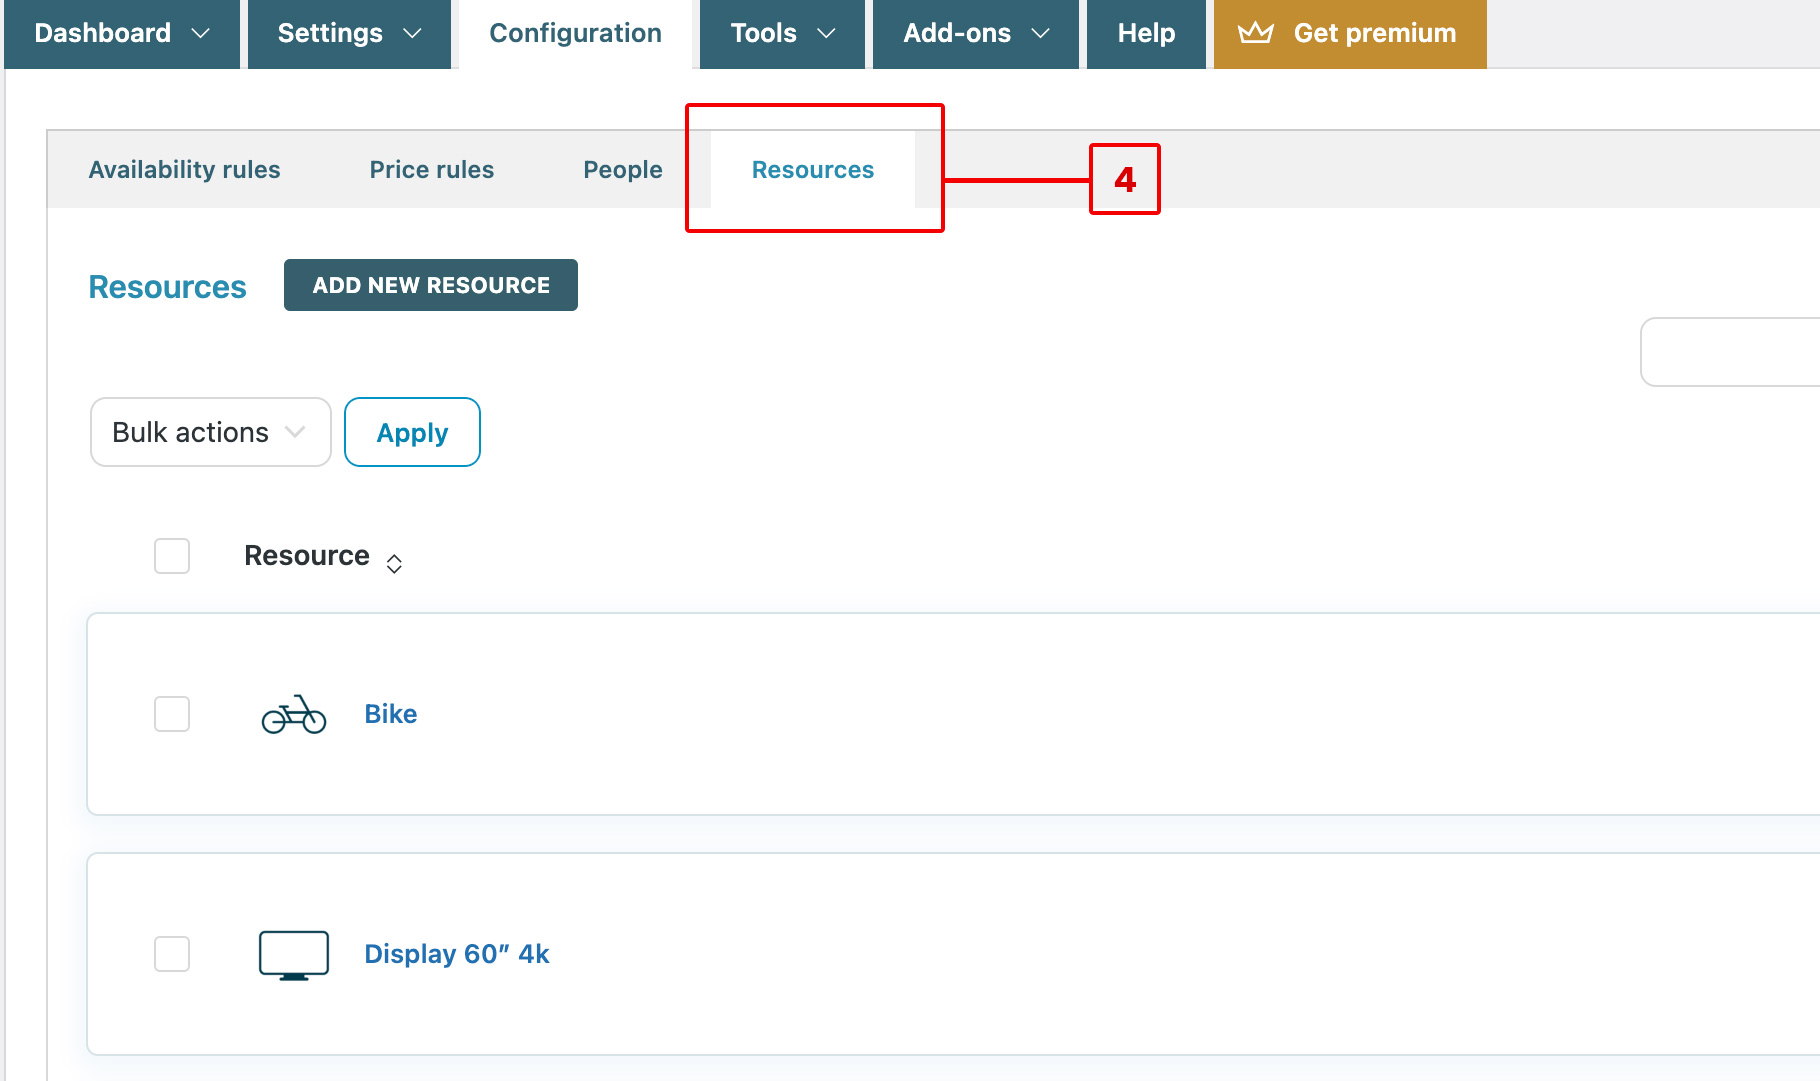
Once you activate the Resources module, you’ll see the Resources subtab (4) within the plugin’s Configuration tab.
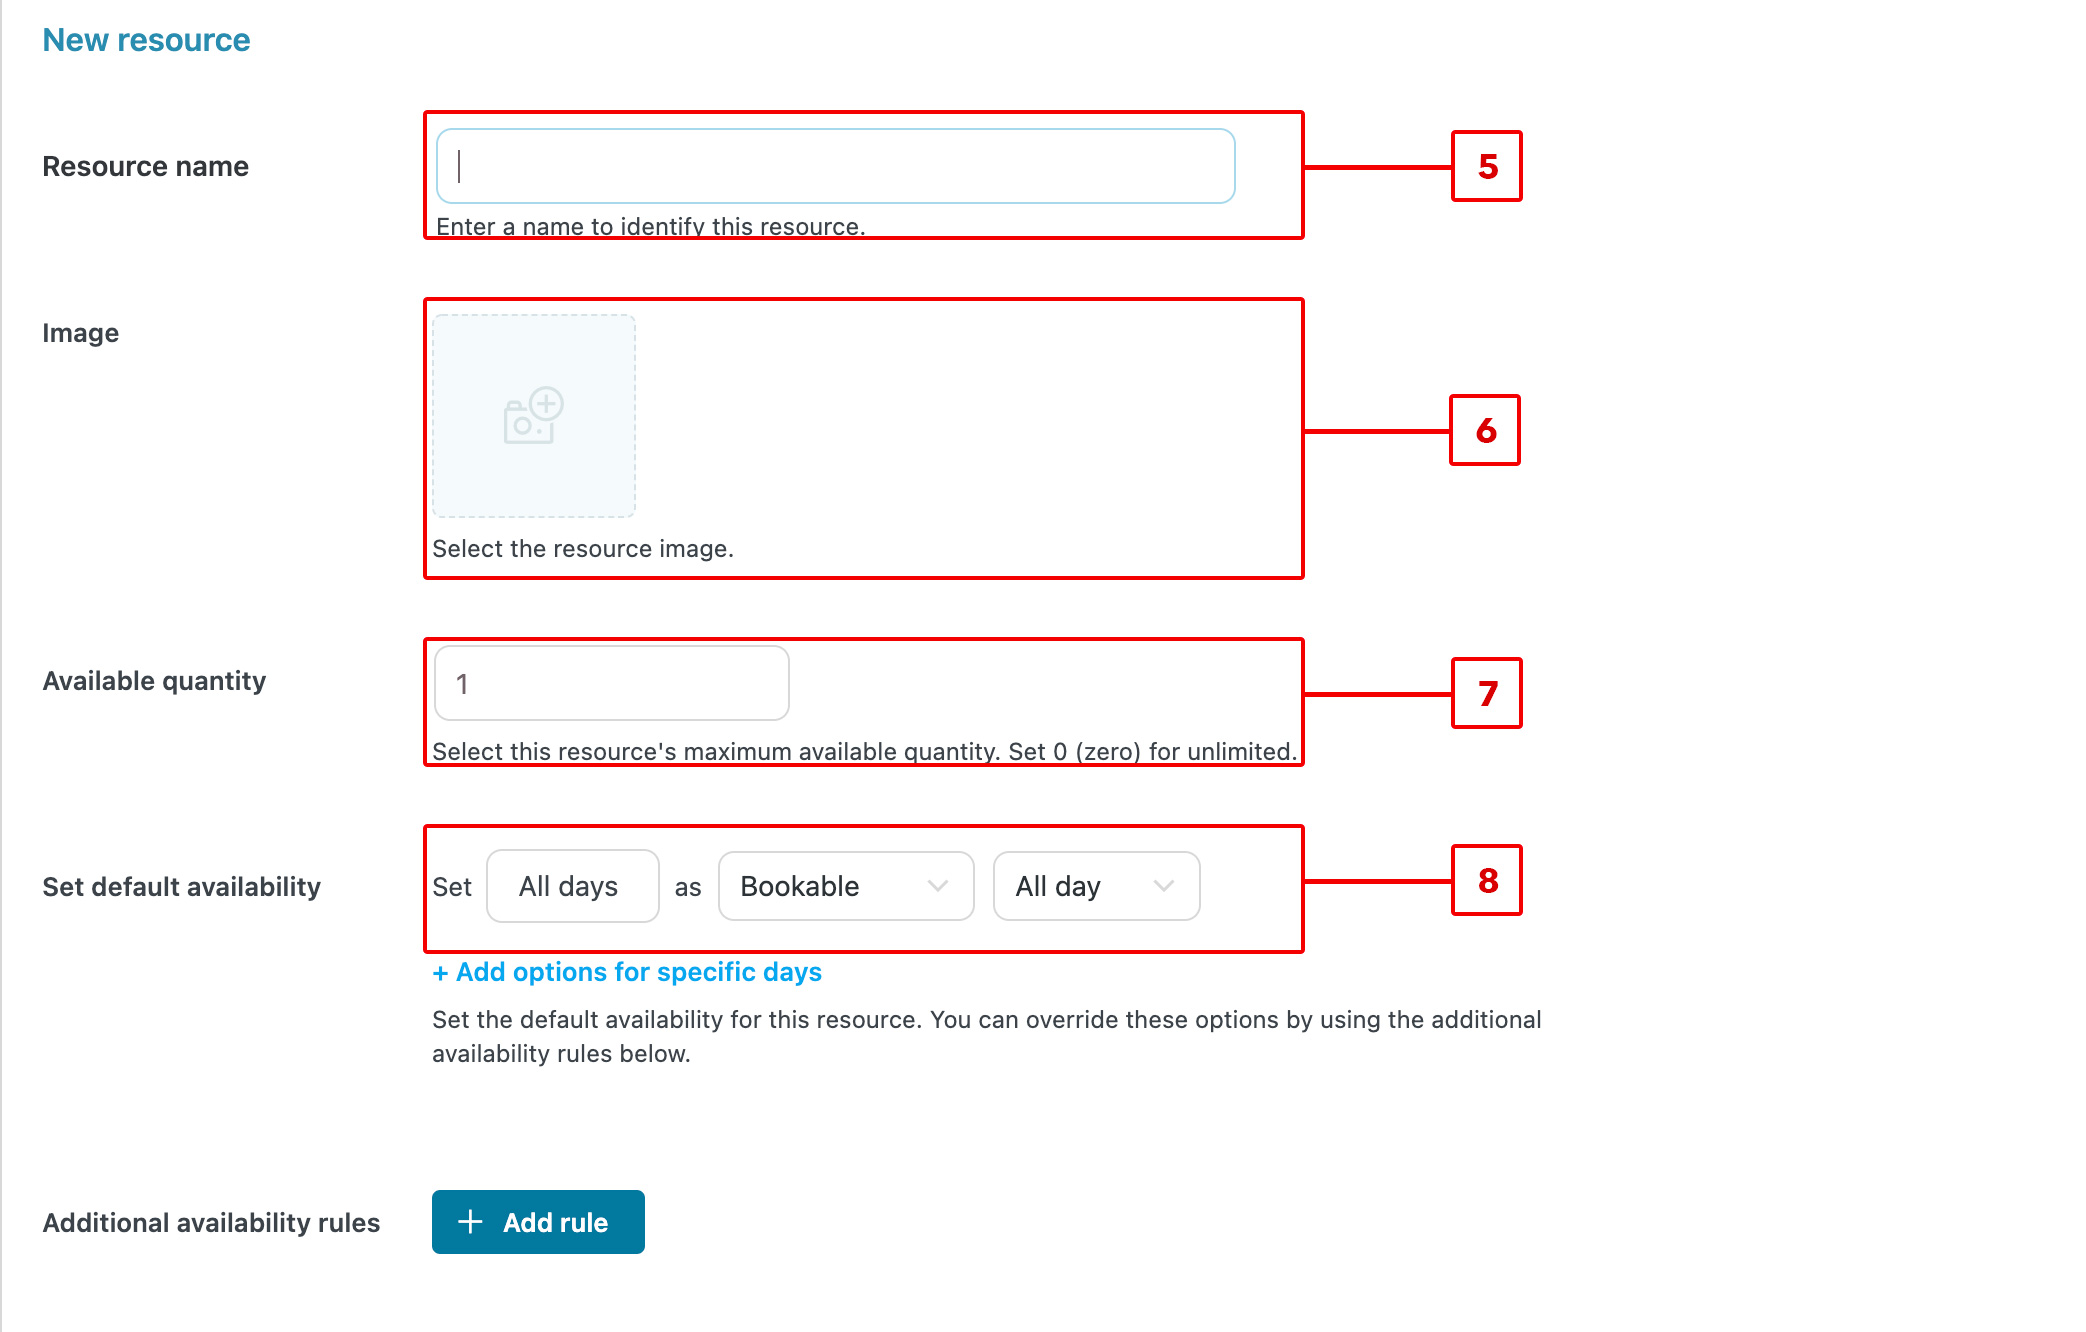
 In this section, click the Add new resource button to create as many resources as you need. For each resource, you can enter a name (5), optionally upload an image (a photo or icon to identify the resource) (6), set the available quantity (7), and define the default availability (8).
 Let’s see some examples:
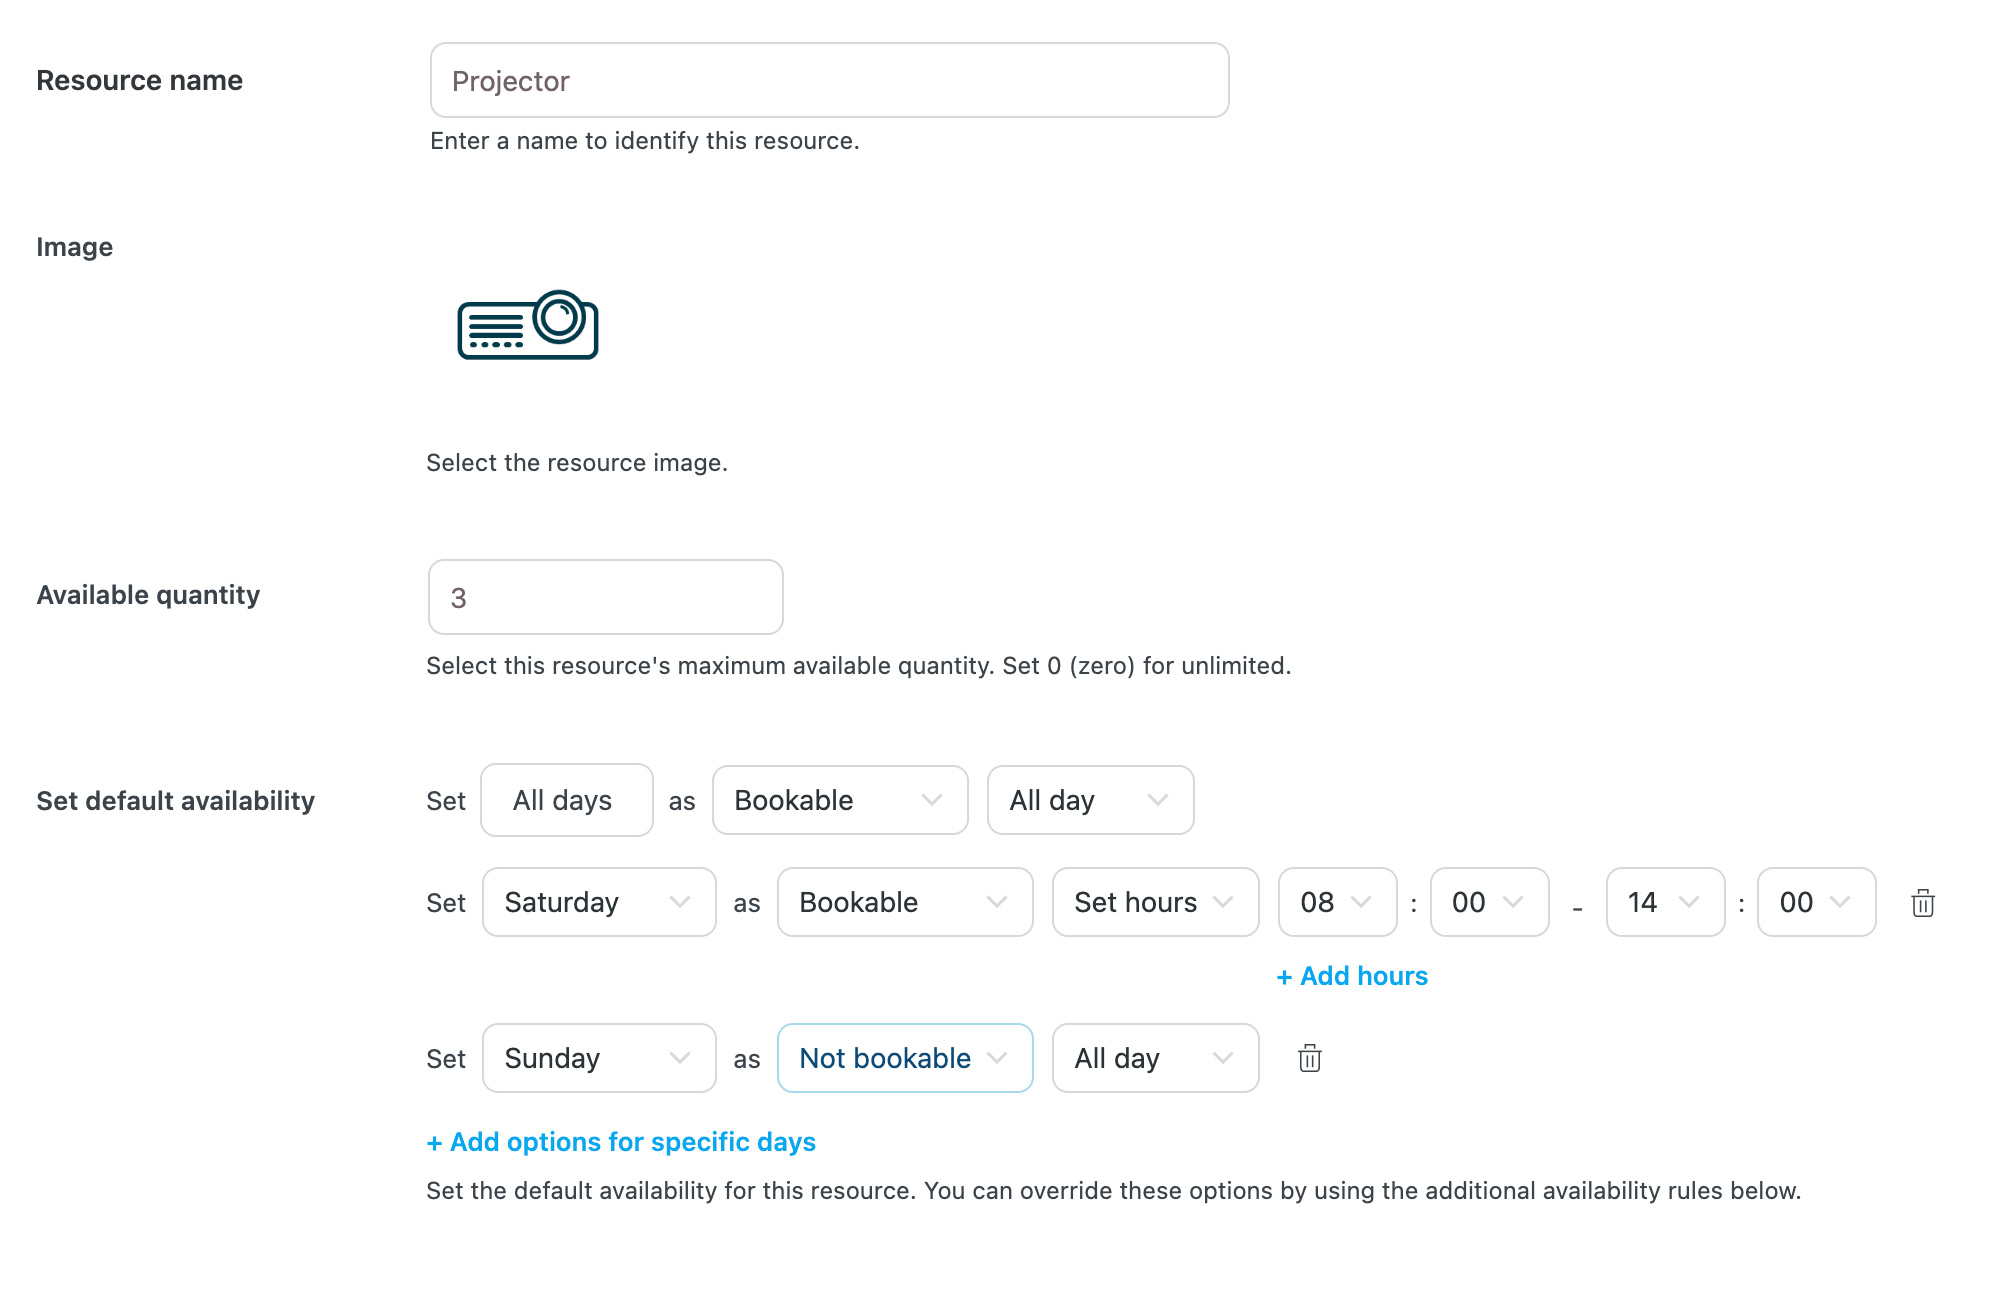
- You rent out meeting rooms and workspaces, but you only have three projectors. Additionally, you want to impose some restrictions on this resource: the projectors will be available only from 8 in the moring to 2 in the afternoon on Saturdays and will not be available at all on Sundays.
- Set the quantity to 3 for the projector resource when you create it.
- Mark the resource as Bookable for All days and All day.
- Click on + Add options for specific days.
- Set Saturdays as Bookable only from 8 AM to 2 PM.
- Click on + Add options for specific days again.
- Set Sundays asNot bookable for All day.
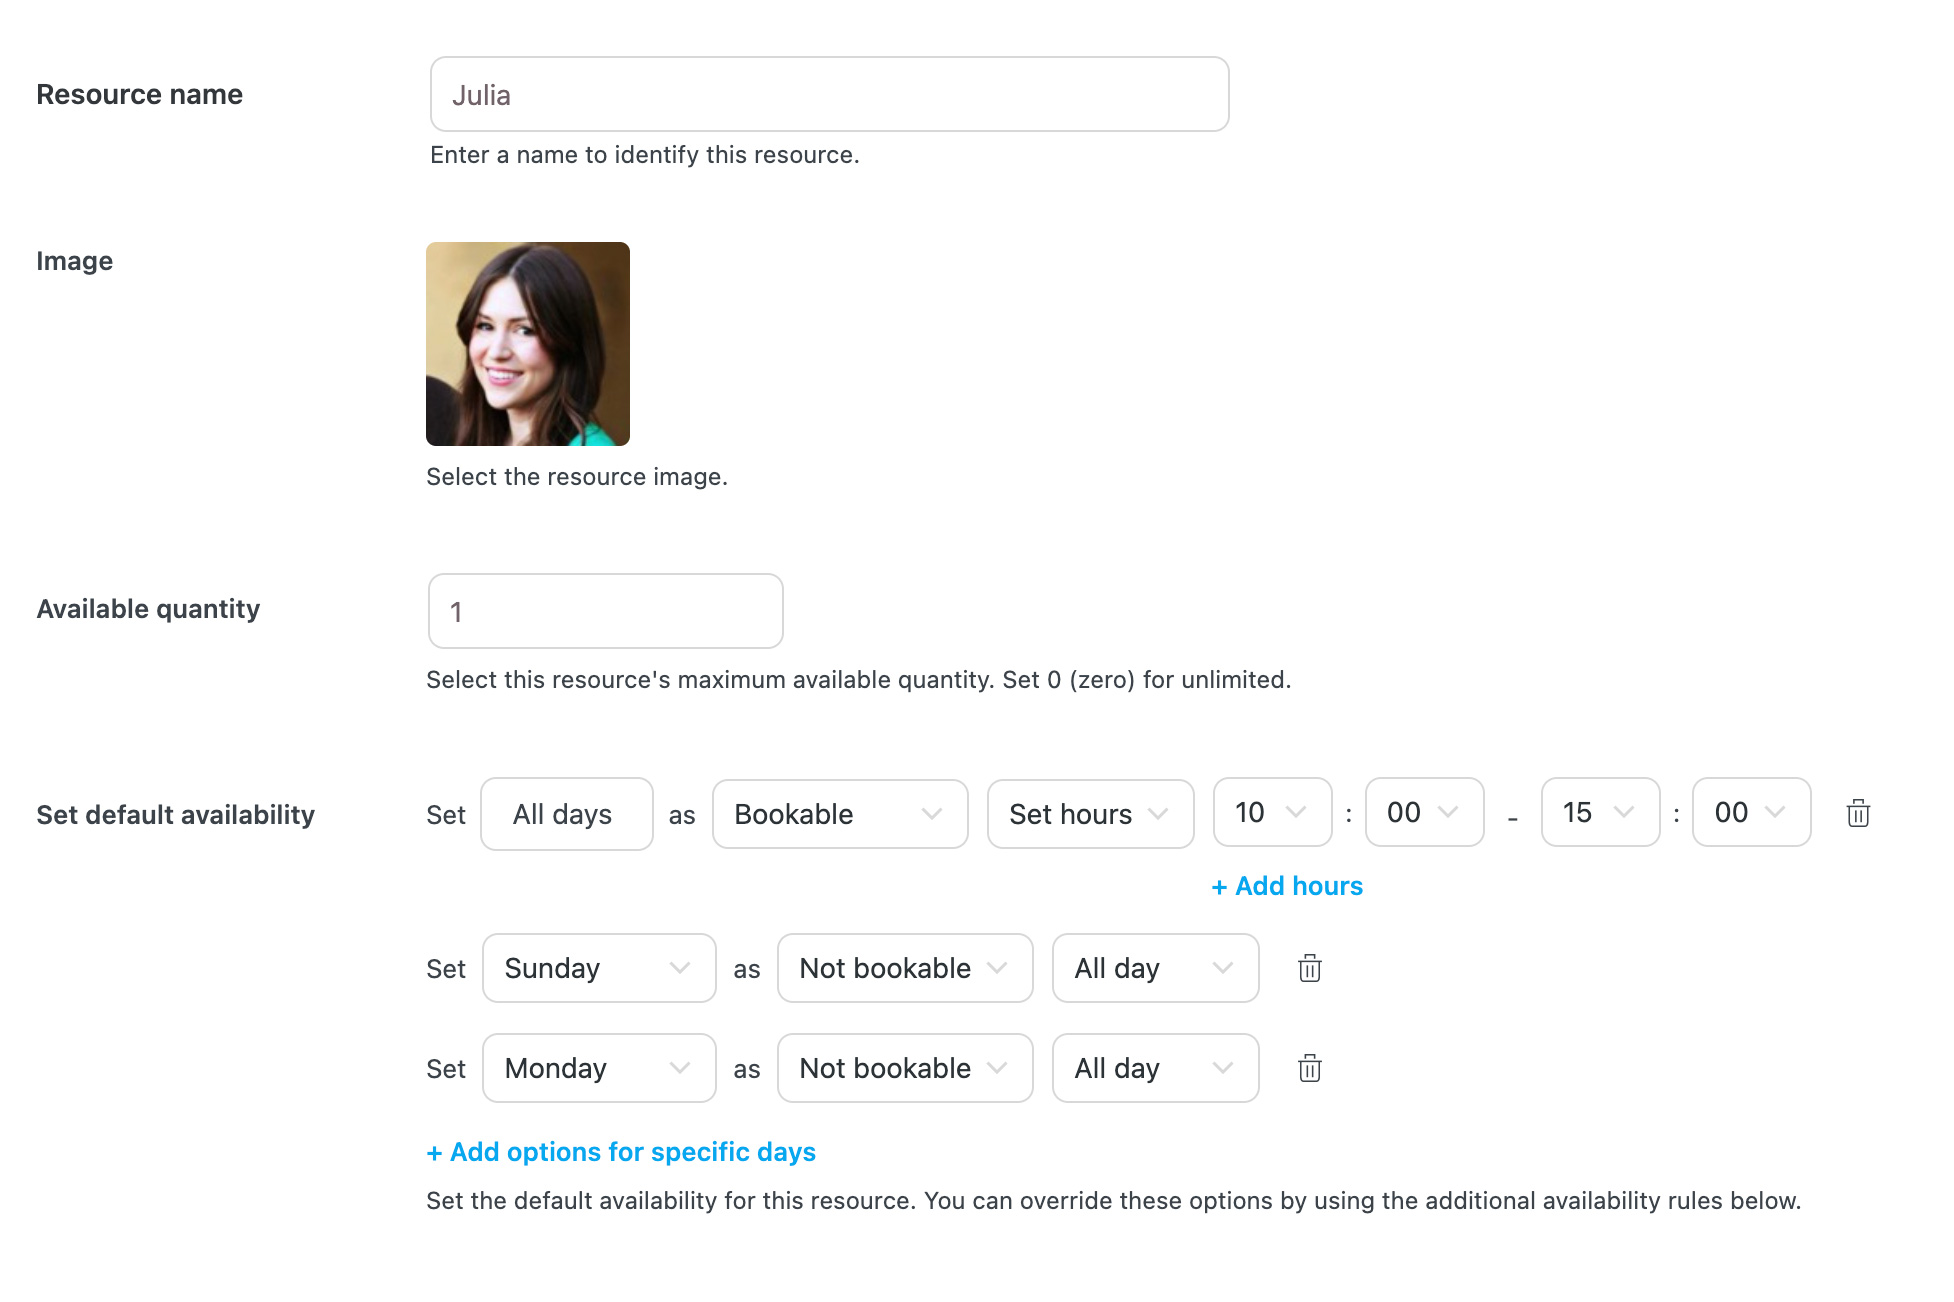
- You run a hairdressing salon with five hairstylists on staff. You want to allow your customers to select their preferred hairstylist when booking a haircut appointment, and you need to manage the availability of your hairstylists in a detailed manner.
- Create a resource for each hairstylist. So, for example, let’s create the resource Julia. Add a photo to identify her.
- Set 1 as the available quantity.
- Adjust Julia’s availability based on her work schedule. For example, you can set her availability to All days from 10 AM to 3 PM. On Sundays and Mondays, when she is not available, mark those days as Not bookable.
Select the Save button to save the resource. You can now configure resources for each bookable product. For detailed instructions, refer to the How to Create a Bookable Product section.
How to Create a Bookable Product
Every product or service you wish to offer through a booking system is handled in WooCommerce as a “bookable product.” Whether you’re taking reservations for a room, a hotel, guitar lessons, or medical appointments, always create a bookable product as your initial step.
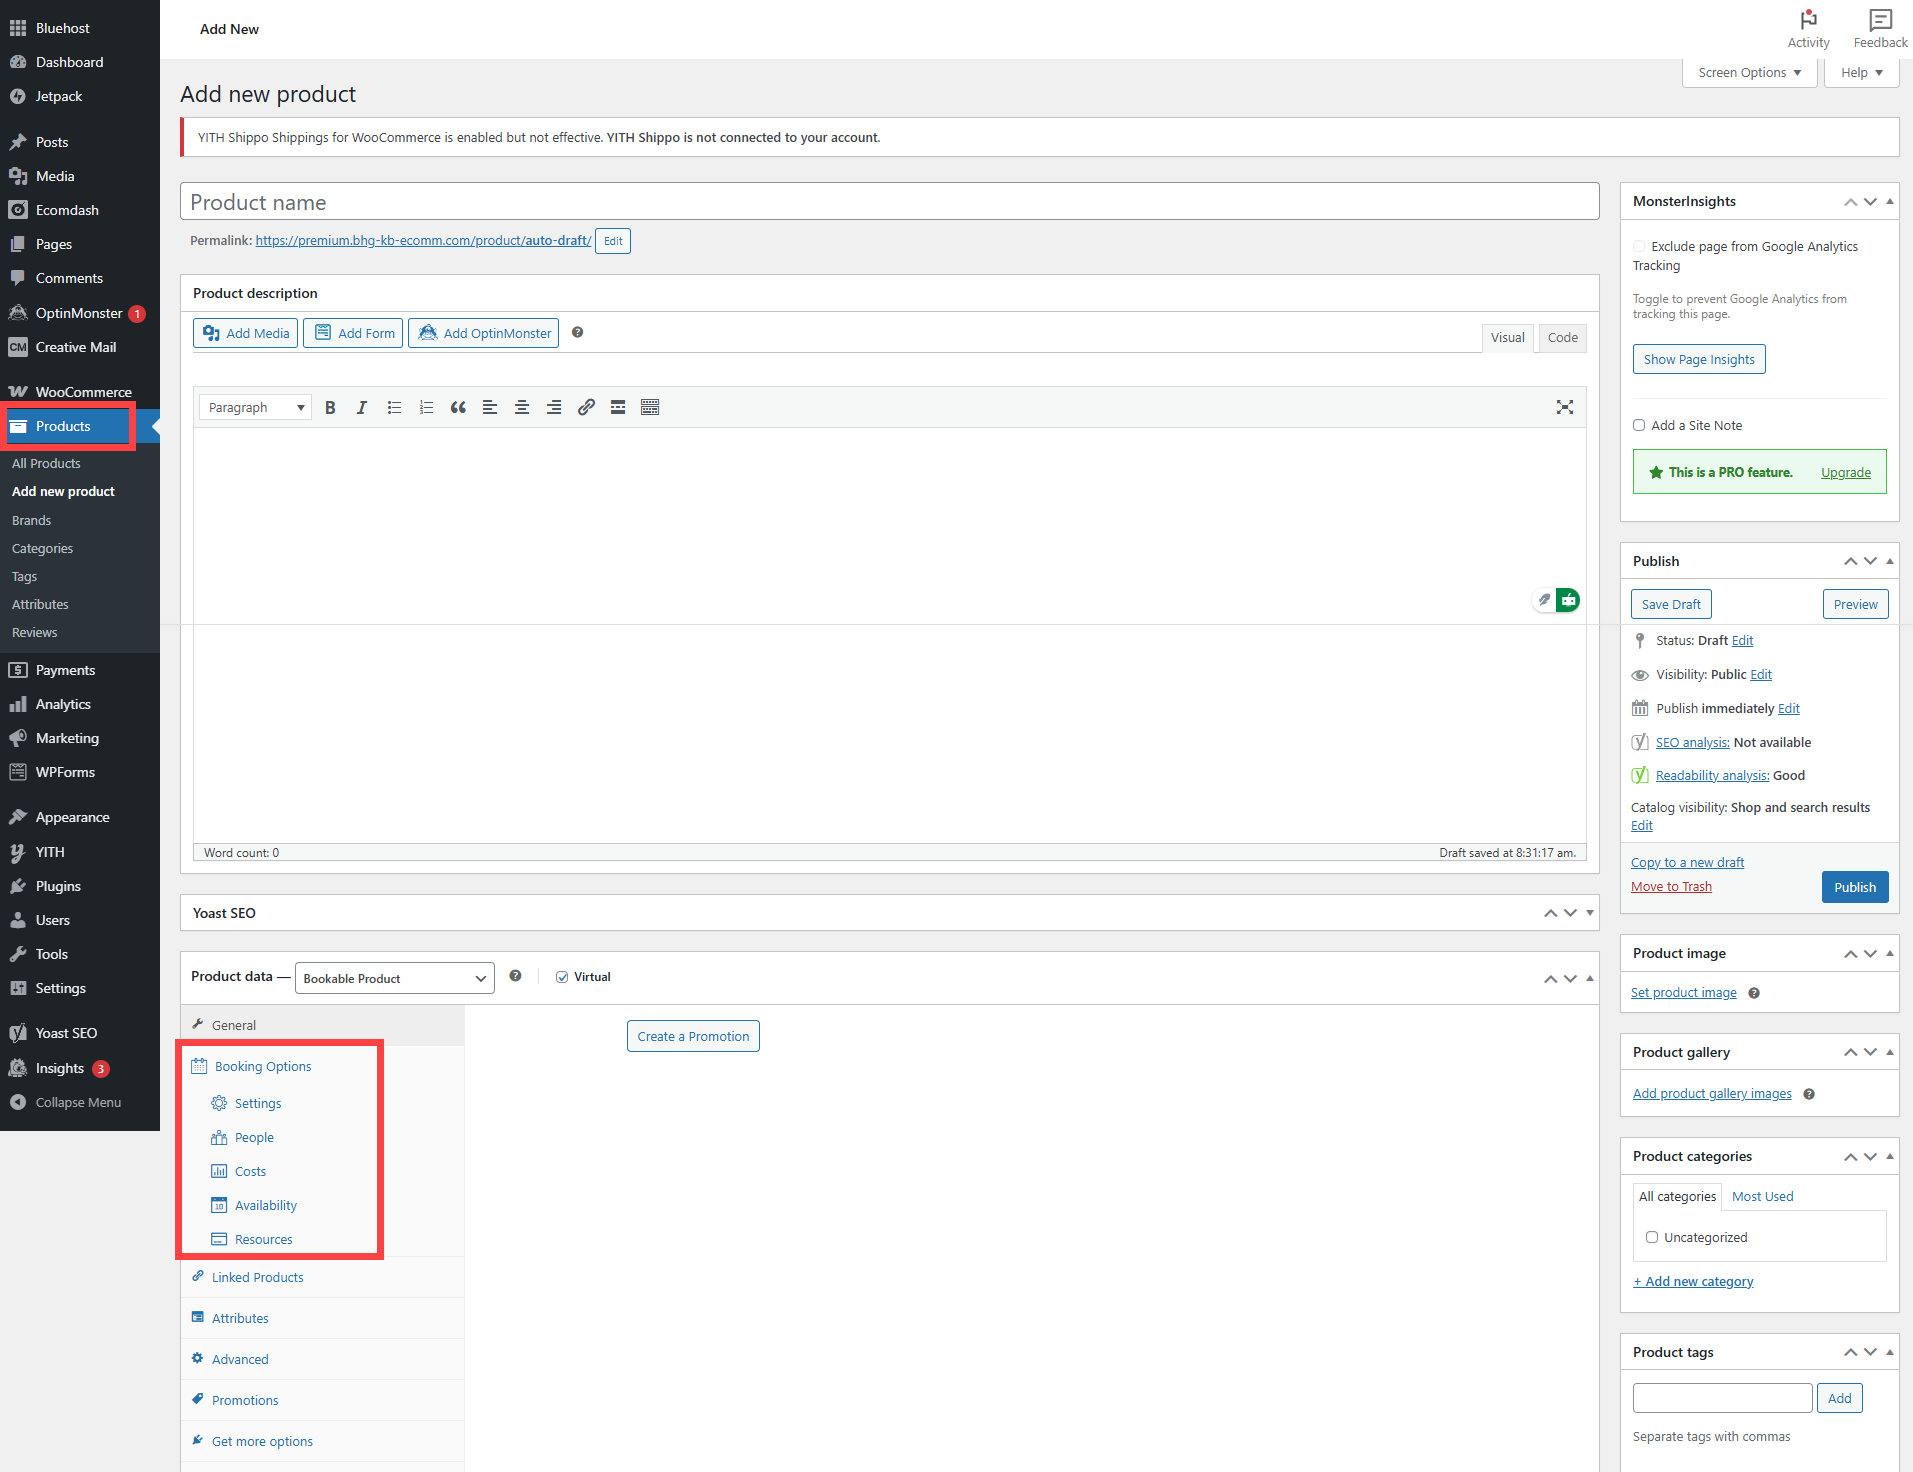
- Navigate to **Products > Add New **for you to create a new product.
- Within the Product Data section, select Bookable Product(9), and if the product is not a physical item that needs to be shipped, check the Virtual option. This will reveal the Booking Options menu (10).
Inserting the Booking Form Into the Bookable Product Page
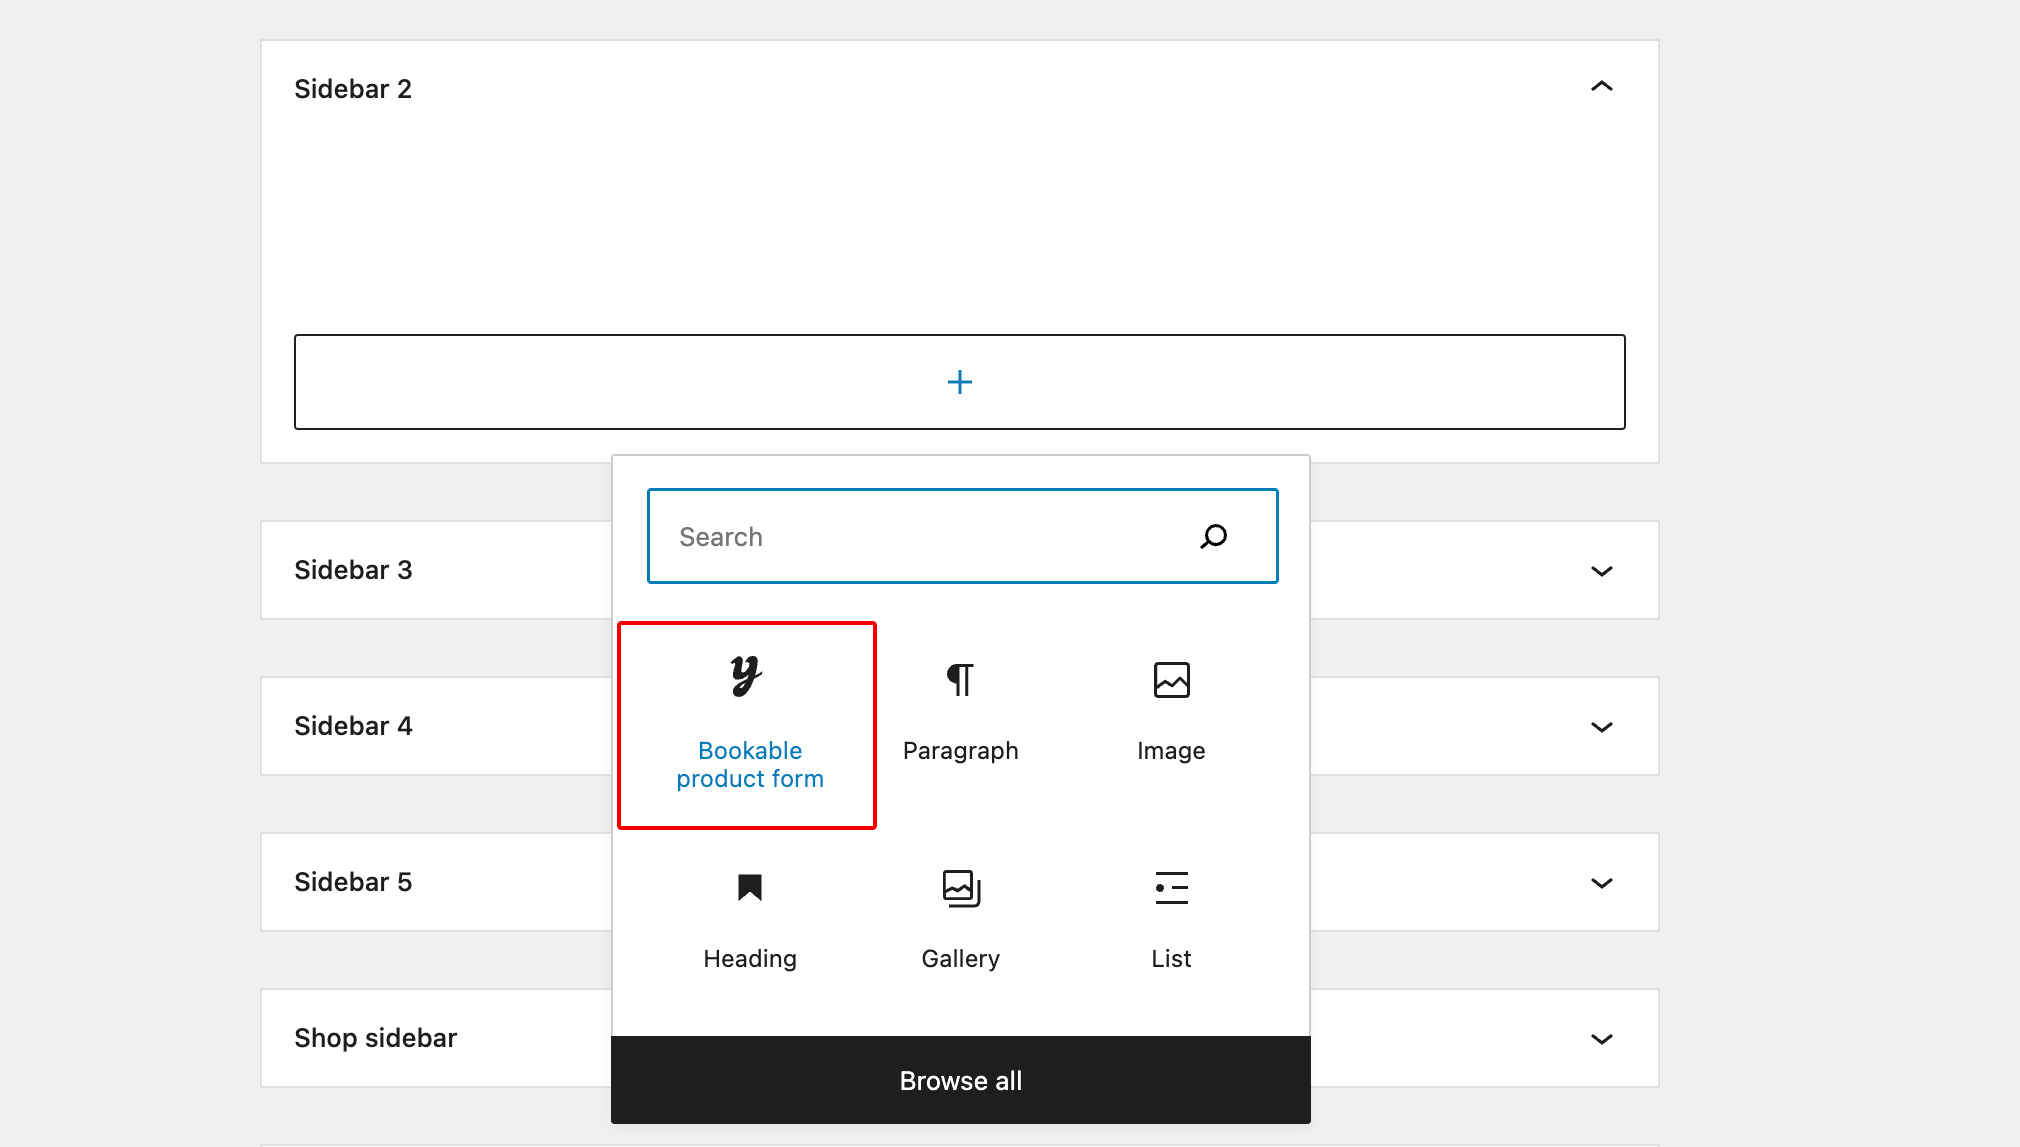
You can insert the booking form into the product page by adding the Bookable product form block to the sidebar of the product page or inside the product page if you are using a block theme.
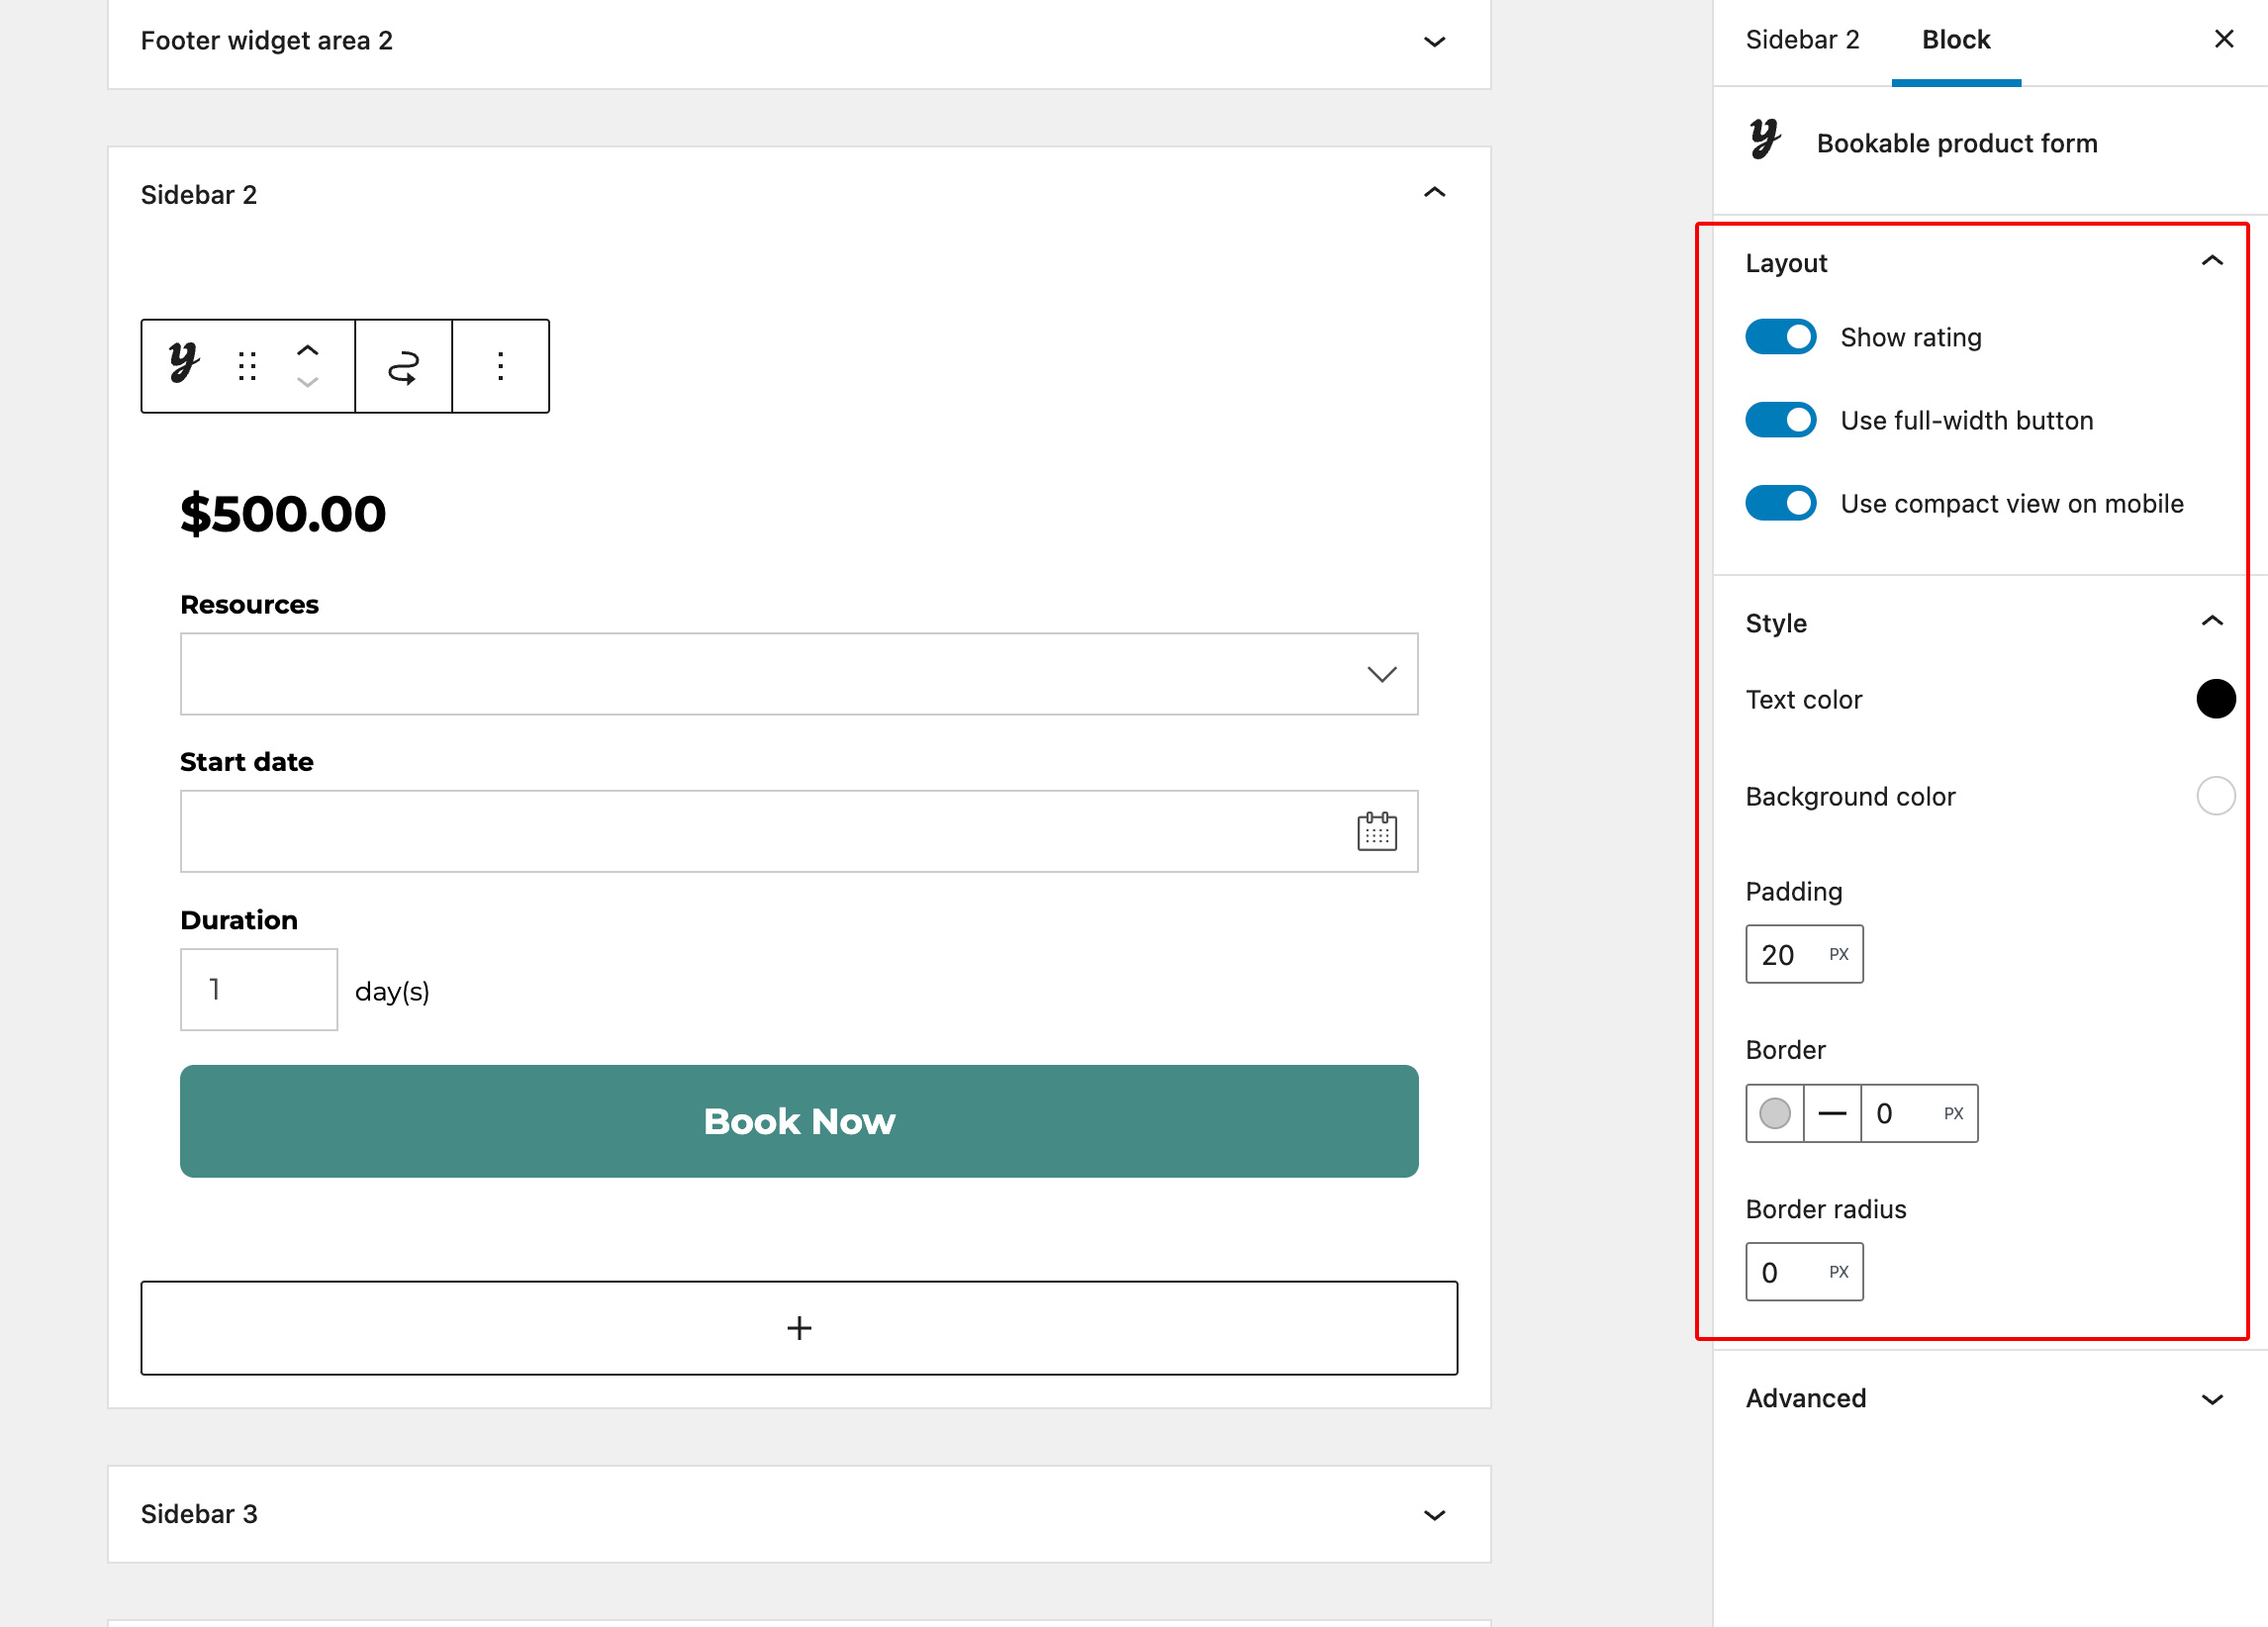
 On the right side, you can also find some options to customize the form: you can choose which elements to show or hide (product title, rating, meta, etc.), customize the style (border-radius, padding, colors, etc.), and customize the Book button.
Inserting the Booking Form of a Specific Bookable Product Into a Custom Page
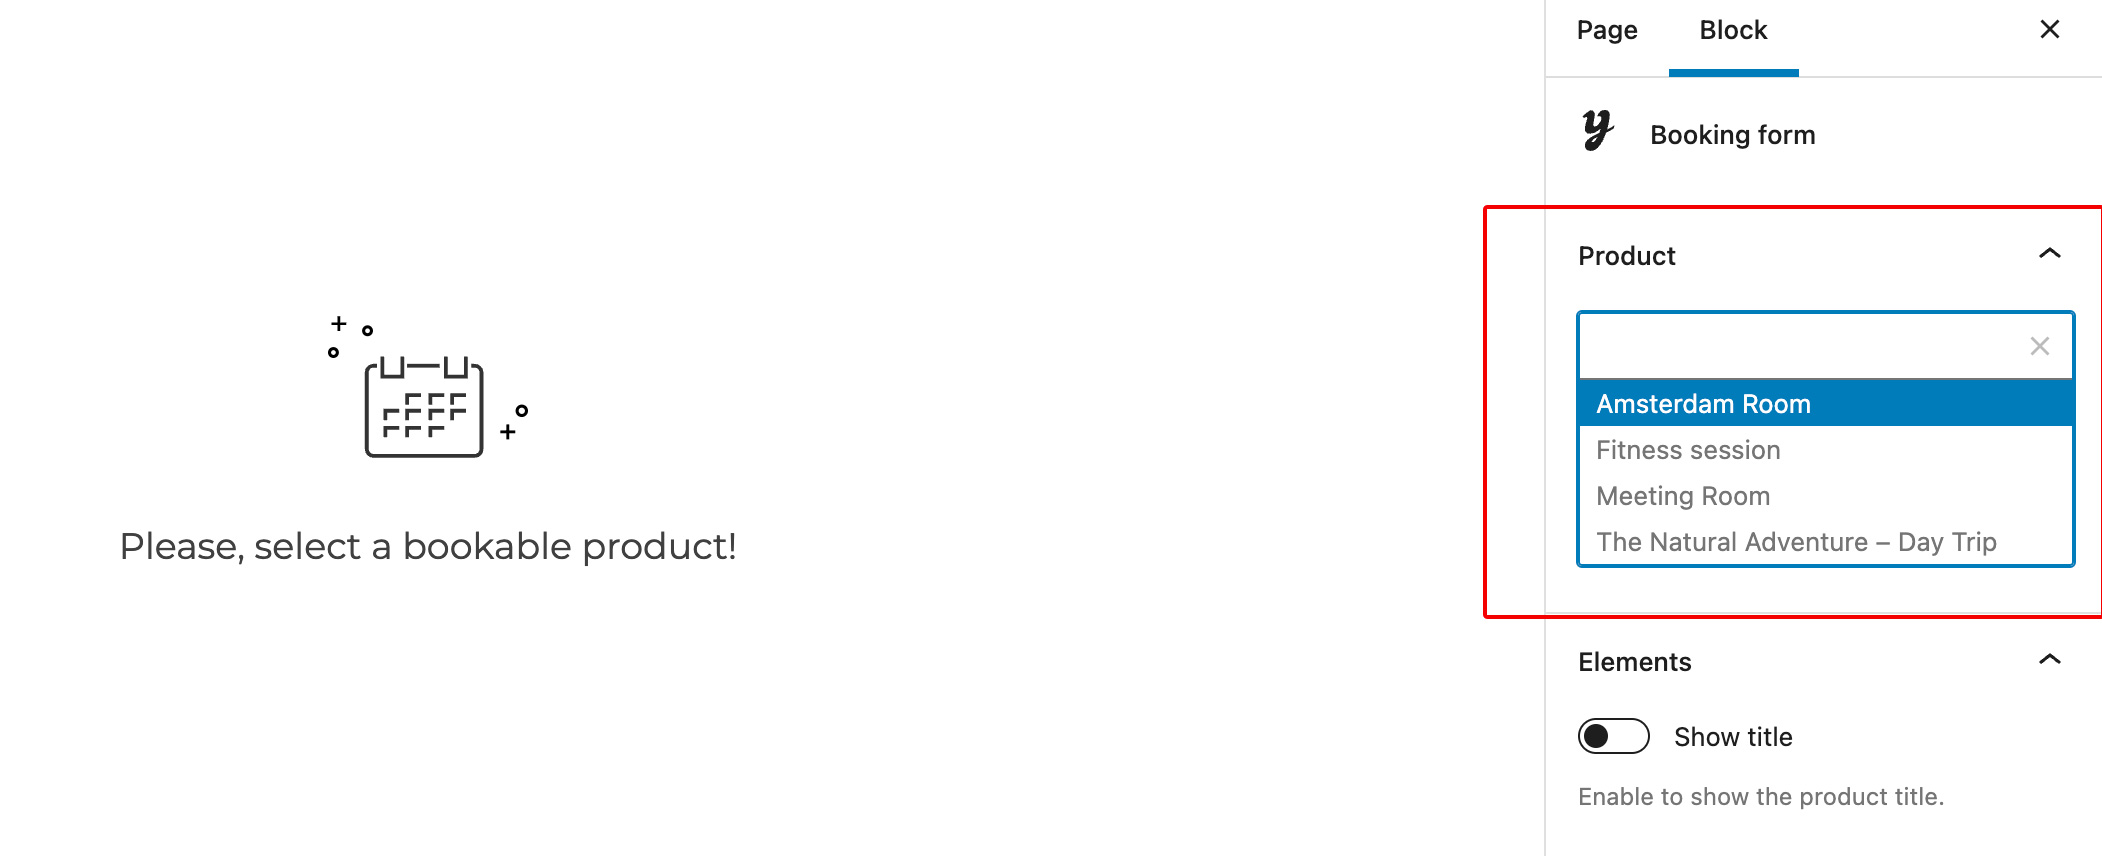
You can also display the booking form for a specific bookable product on any page of your site. For instance, if you want to create a landing page with the booking form or feature it in the header of your home page, you can use the Booking Form block. Simply insert the block and then, on the right side, link the form to a specific bookable product.
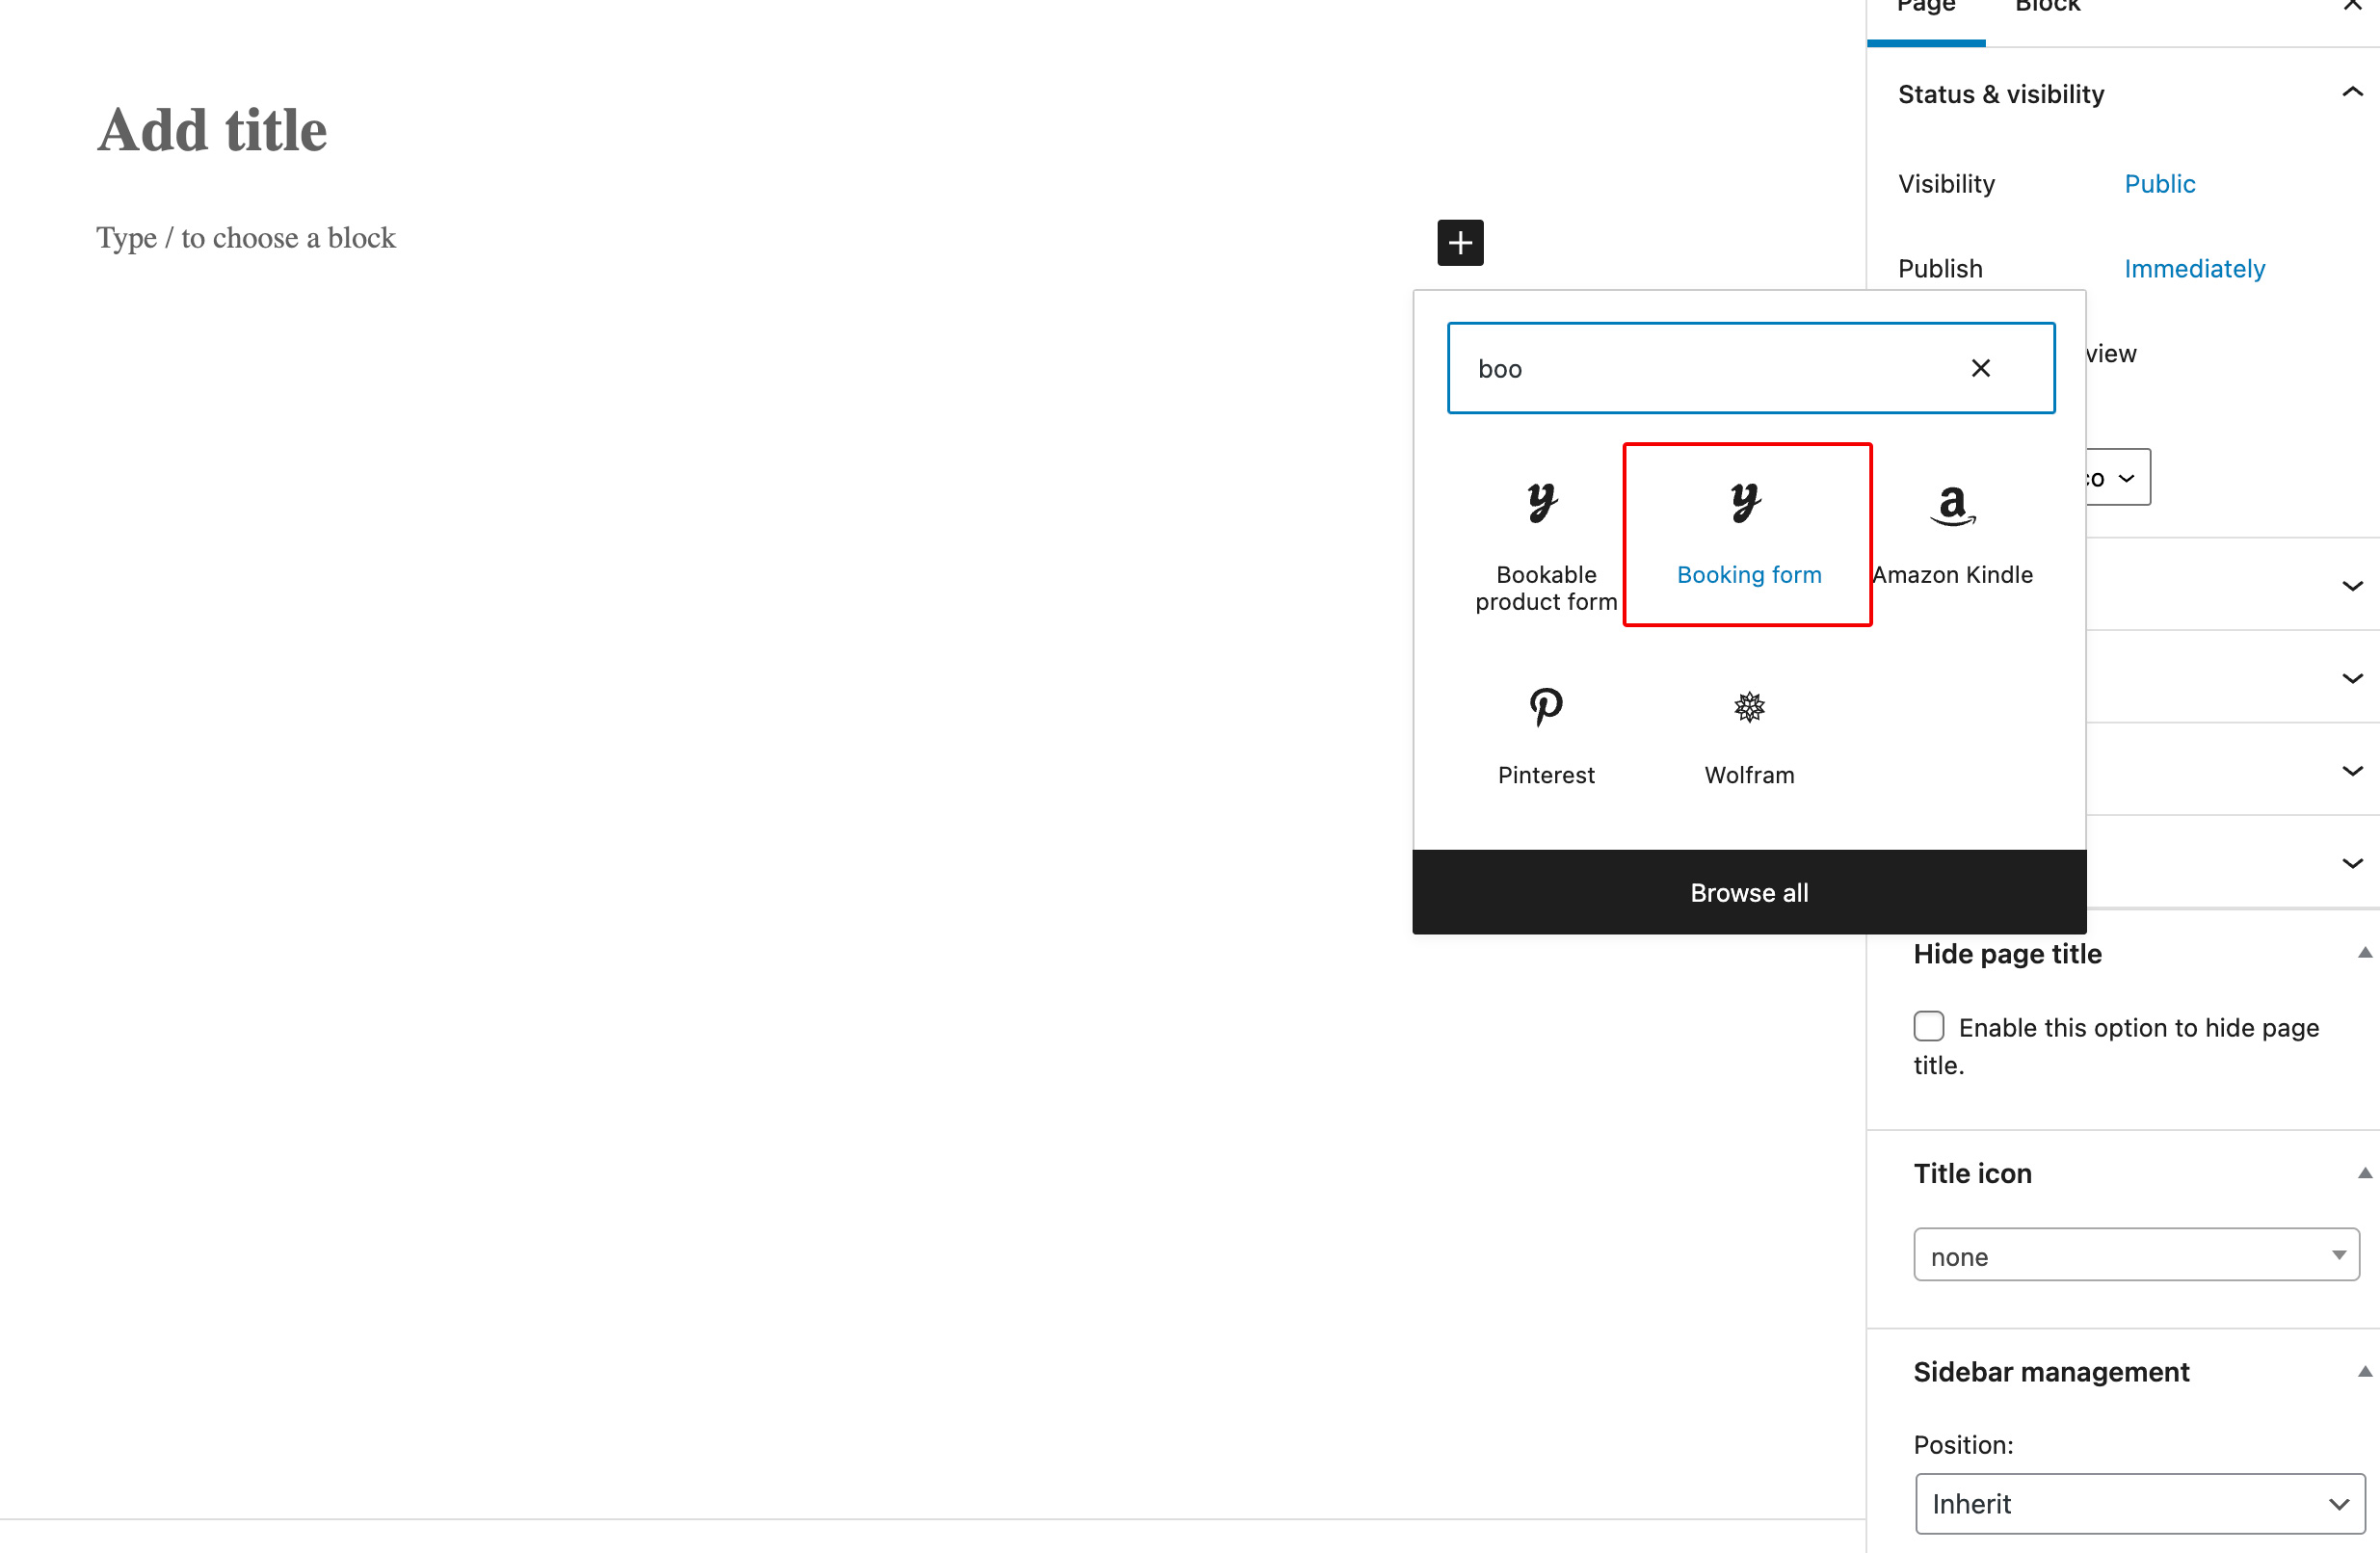 Add the block and then, on the right side, link the form to a specific bookable product:
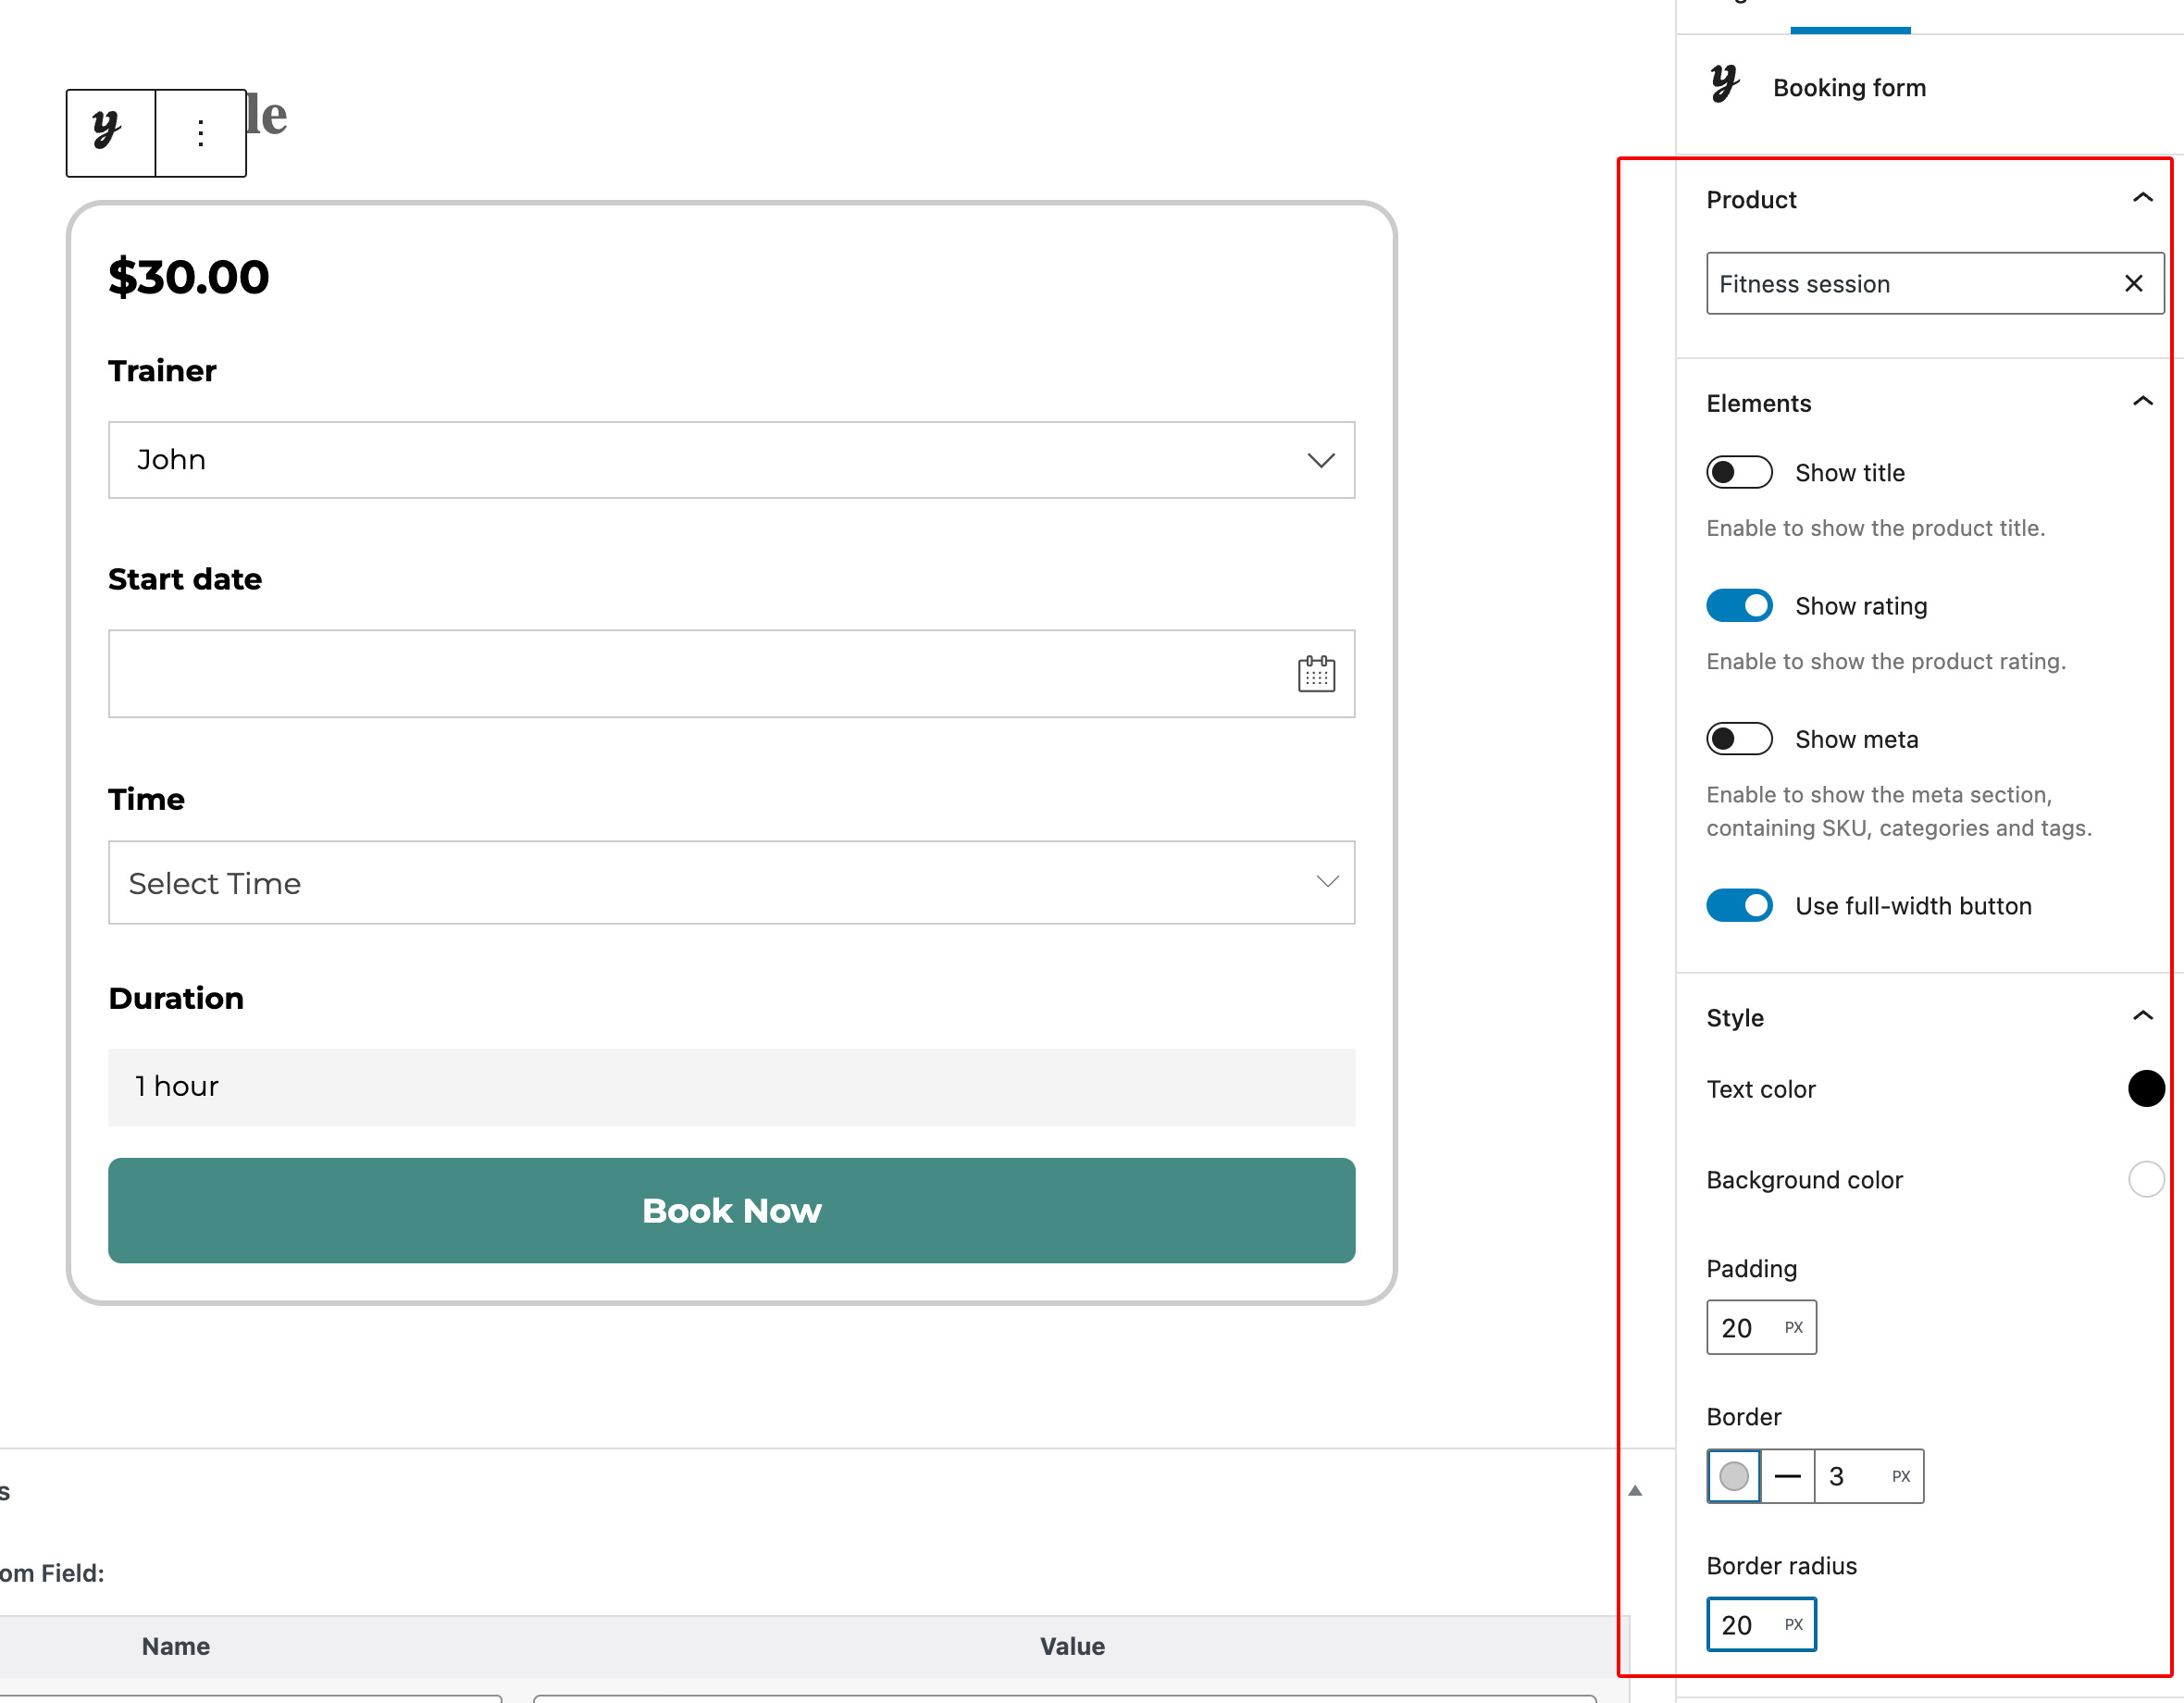
 Some customization options for the form on the right side are showing/hiding which elements will appear (product title, rating, meta, etc.), customizing the style (border-radius, padding, colors, etc.), and the Book button.
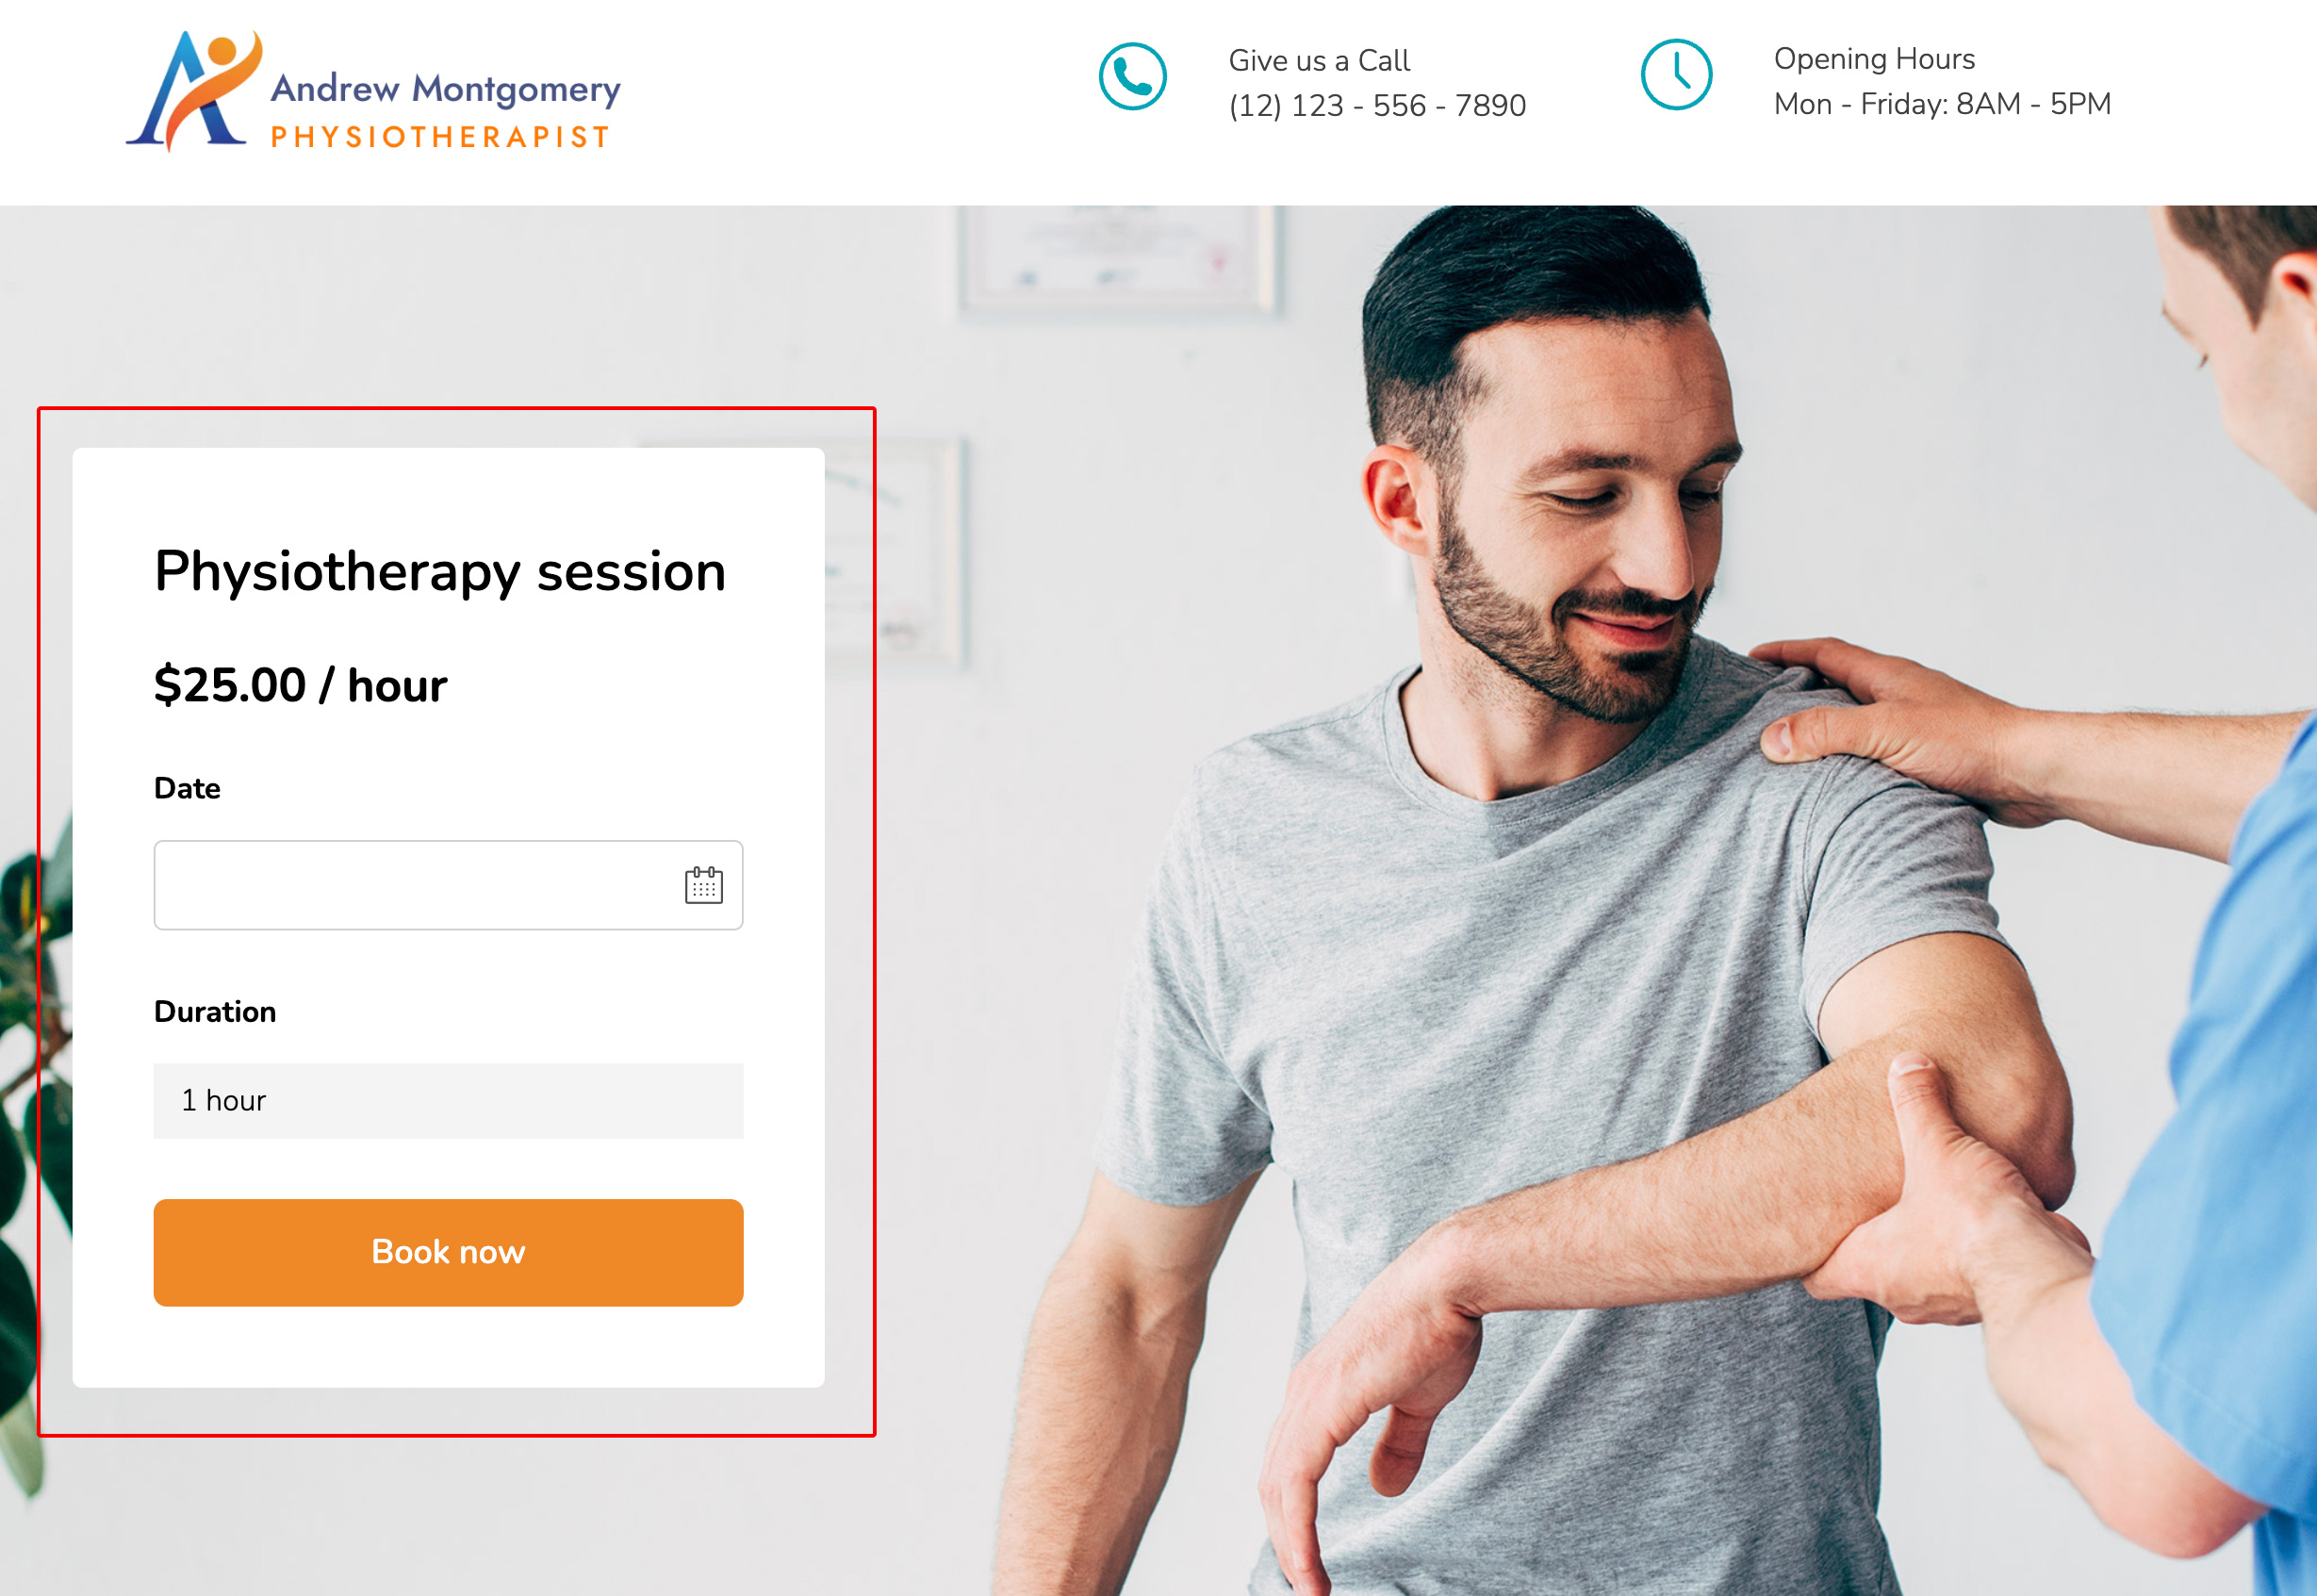
 Here’s an example of a custom page featuring a booking form that lets users schedule a “physiotherapy session” directly without needing to navigate to the bookable product page.
Plugin options
Dashboard and Calendar

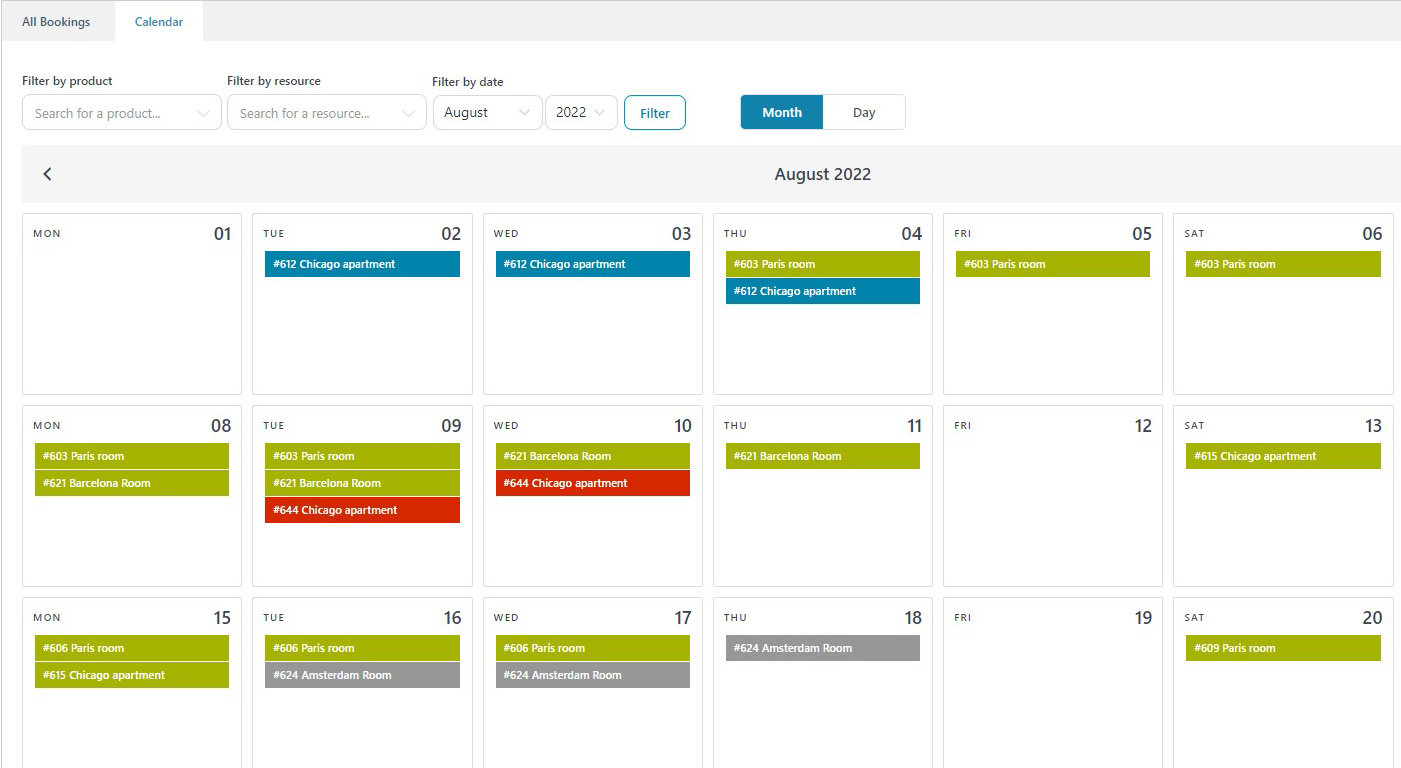
- In the Dashboard tab, you’ll see a table listing all customer bookings. You can filter these bookings by date, use bulk actions to export them to CSV or ICS files, and manually edit bookings if necessary.
- The Calendar subtab provides an alternative view of your bookings. Additionally, you can check the Resources calendar to keep track of their availability.
Booking Form Options


- Choose the booking form position: you can use the block as explained above or choose a fixed position on the product page (before or after the description, after the summary, etc.).
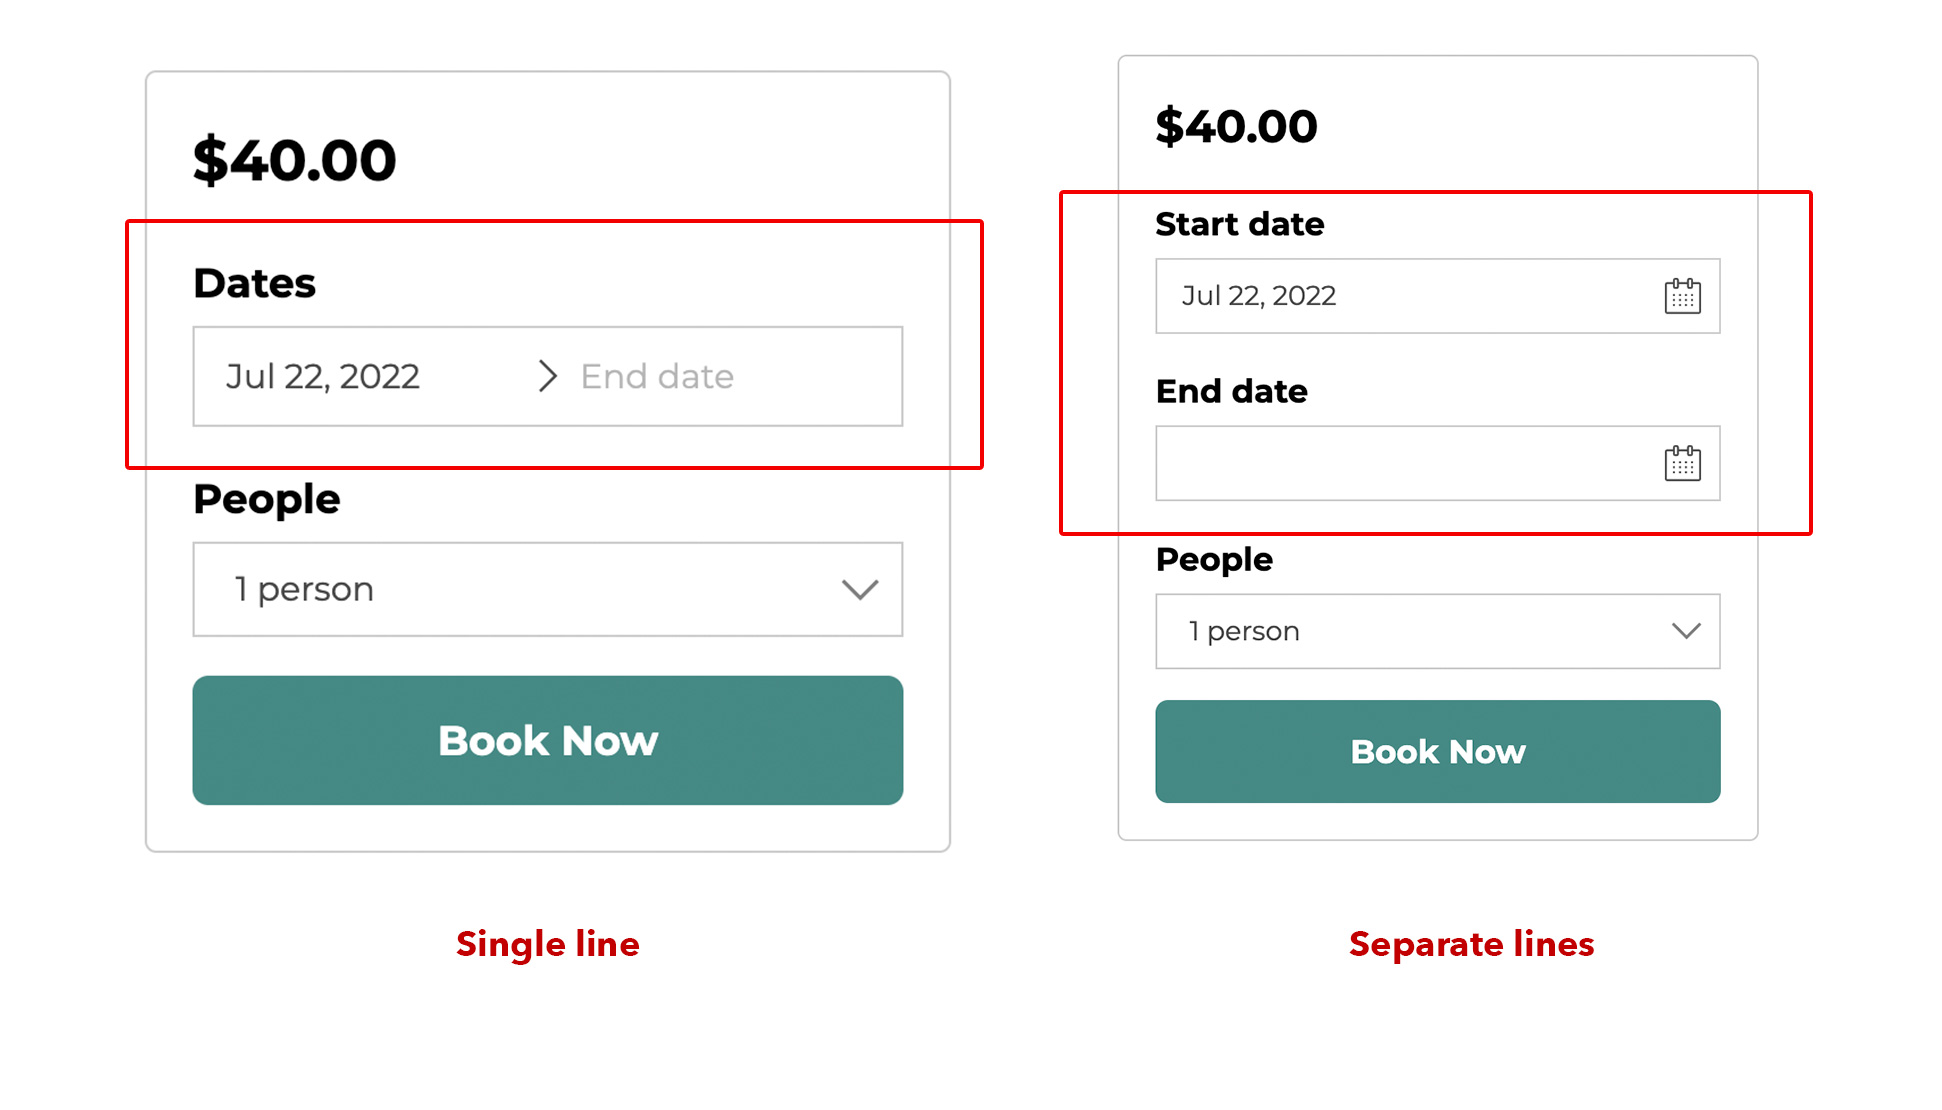
- Choose date range format: you can also make the date picker to be shown as one field or as two fields.
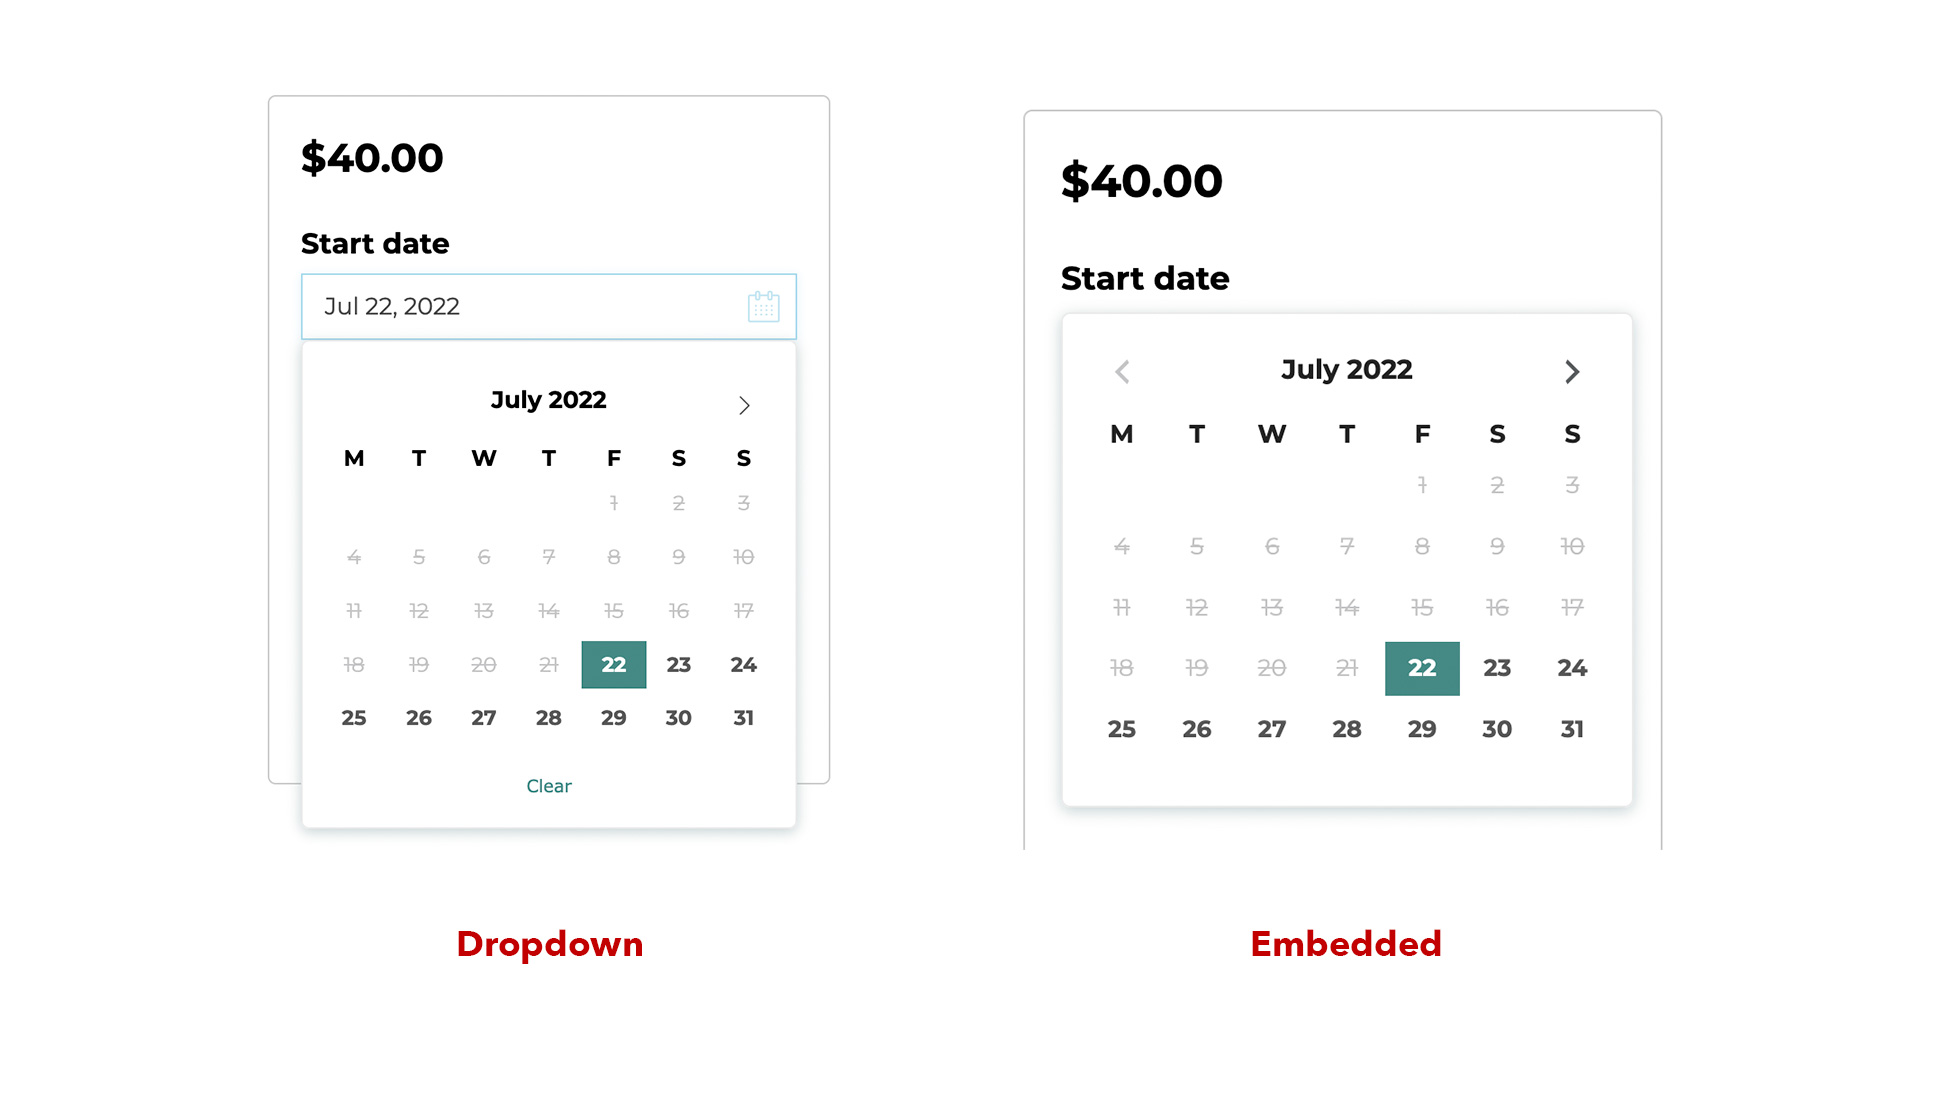
- Choose the calendar layout: dropdown layout or embedded one on the page.
- Choose how many months to preload in the calendar. The rest of them will load via AJAX. We strongly recommend showing no more than 3 months as a limit for performance when possible.
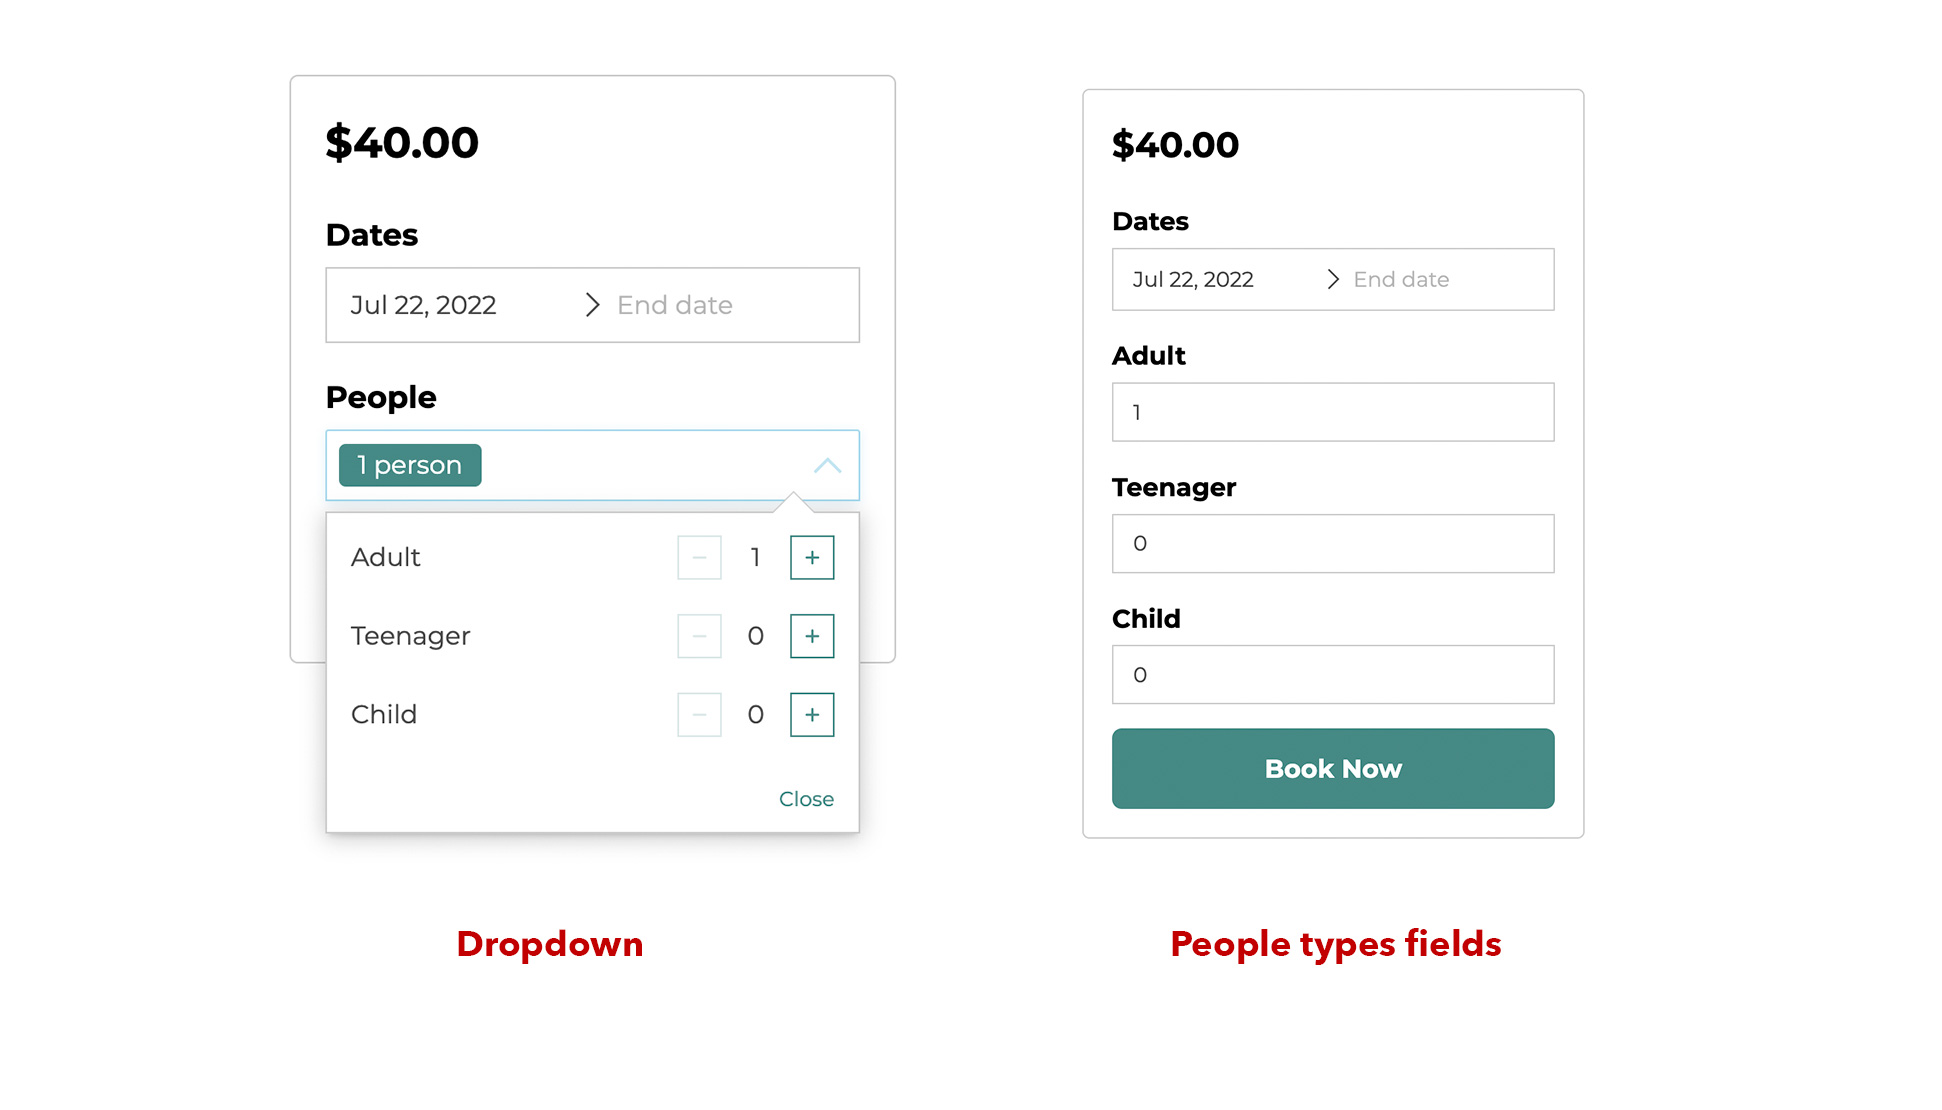
- Choose how to show the people selector: You can choose to show the people in a dropdown or to list all of them directly on the page.
- Enable the min/max duration control in the calendar: if you have a min/max duration set in the bookable product, the calendar will disable dates according to this option (e.g., if the minimum duration is 7 days, users can only select dates according to this limit, the other dates will be disabled).
- Decide whether to disable dates that have no available time slots.
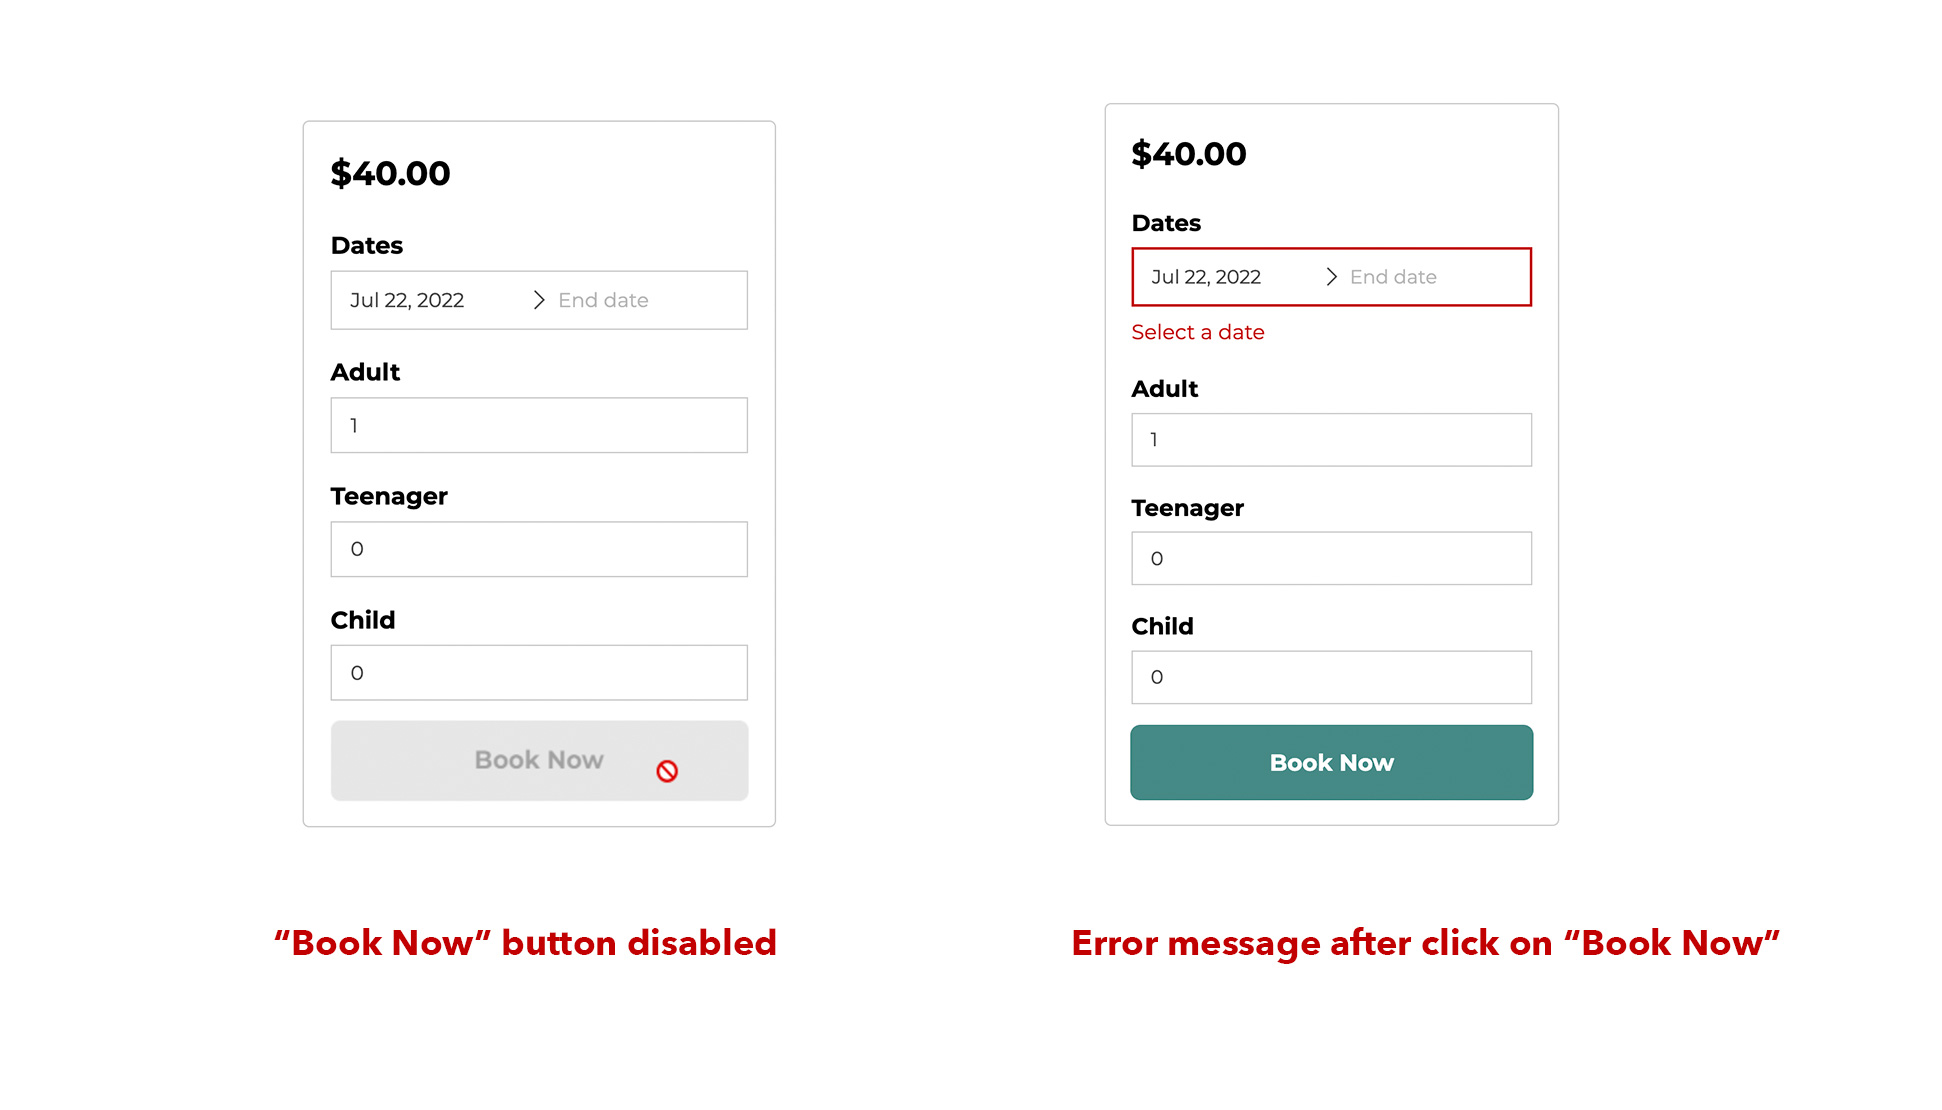
- Determine what to do when there is an error in the booking form. You can deactivate the Book button until the user has selected the right dates and options, or you may leave the button active, and an error message will be displayed if the user chooses an unavailable date or option.
Calendar Options
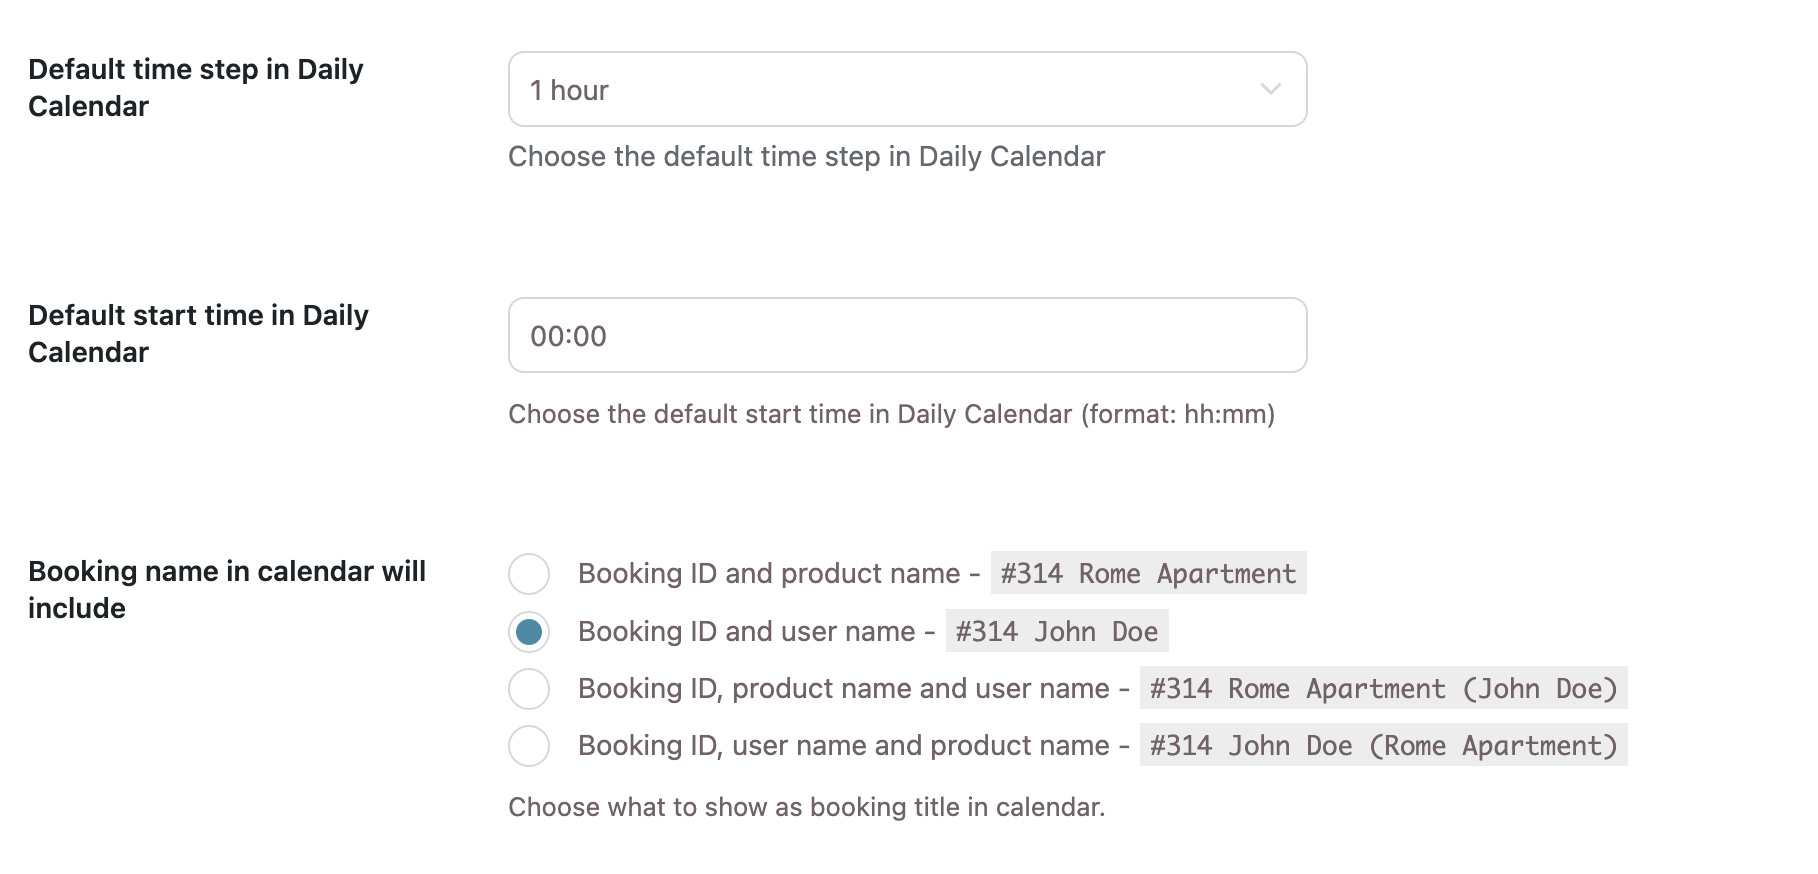
- Customize the view of the calendar available in Dashboard > Calendar : you can choose the default start time and time step and which details to show to identify the bookings in the calendar (Booking ID, customer name, bookable product name, etc.).
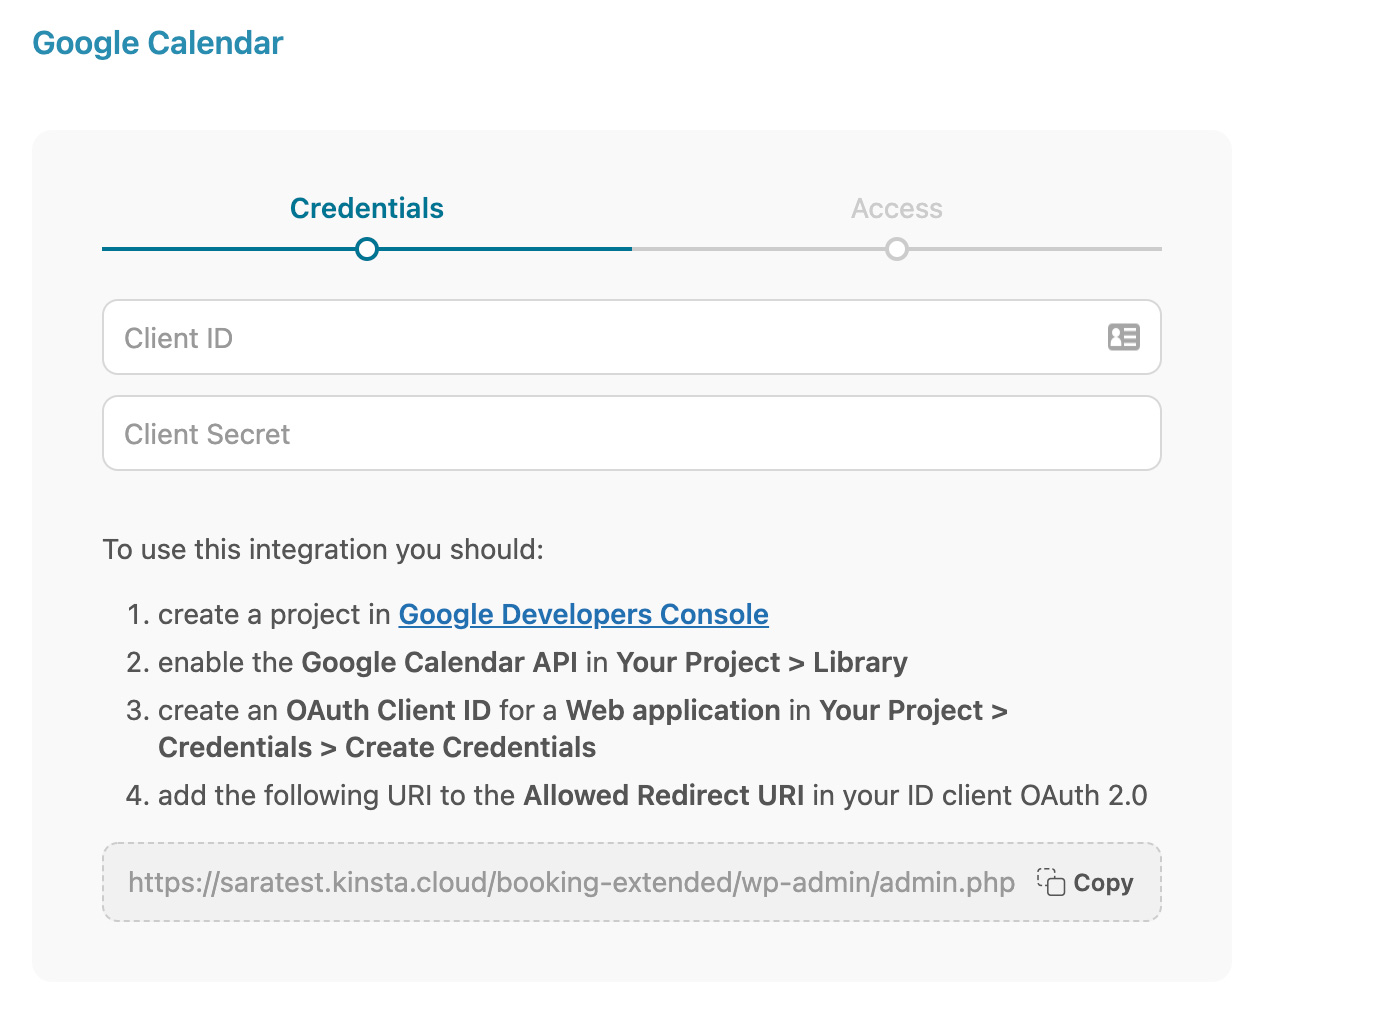
- If the Google Calendar module is activated, you can input your Client ID and Client Secret to connect and sync your account. Follow the instructions on the page to find this information.
Customization Options
This chapter contains additional functionality to make the plugin conform to your precise needs and your store's style.
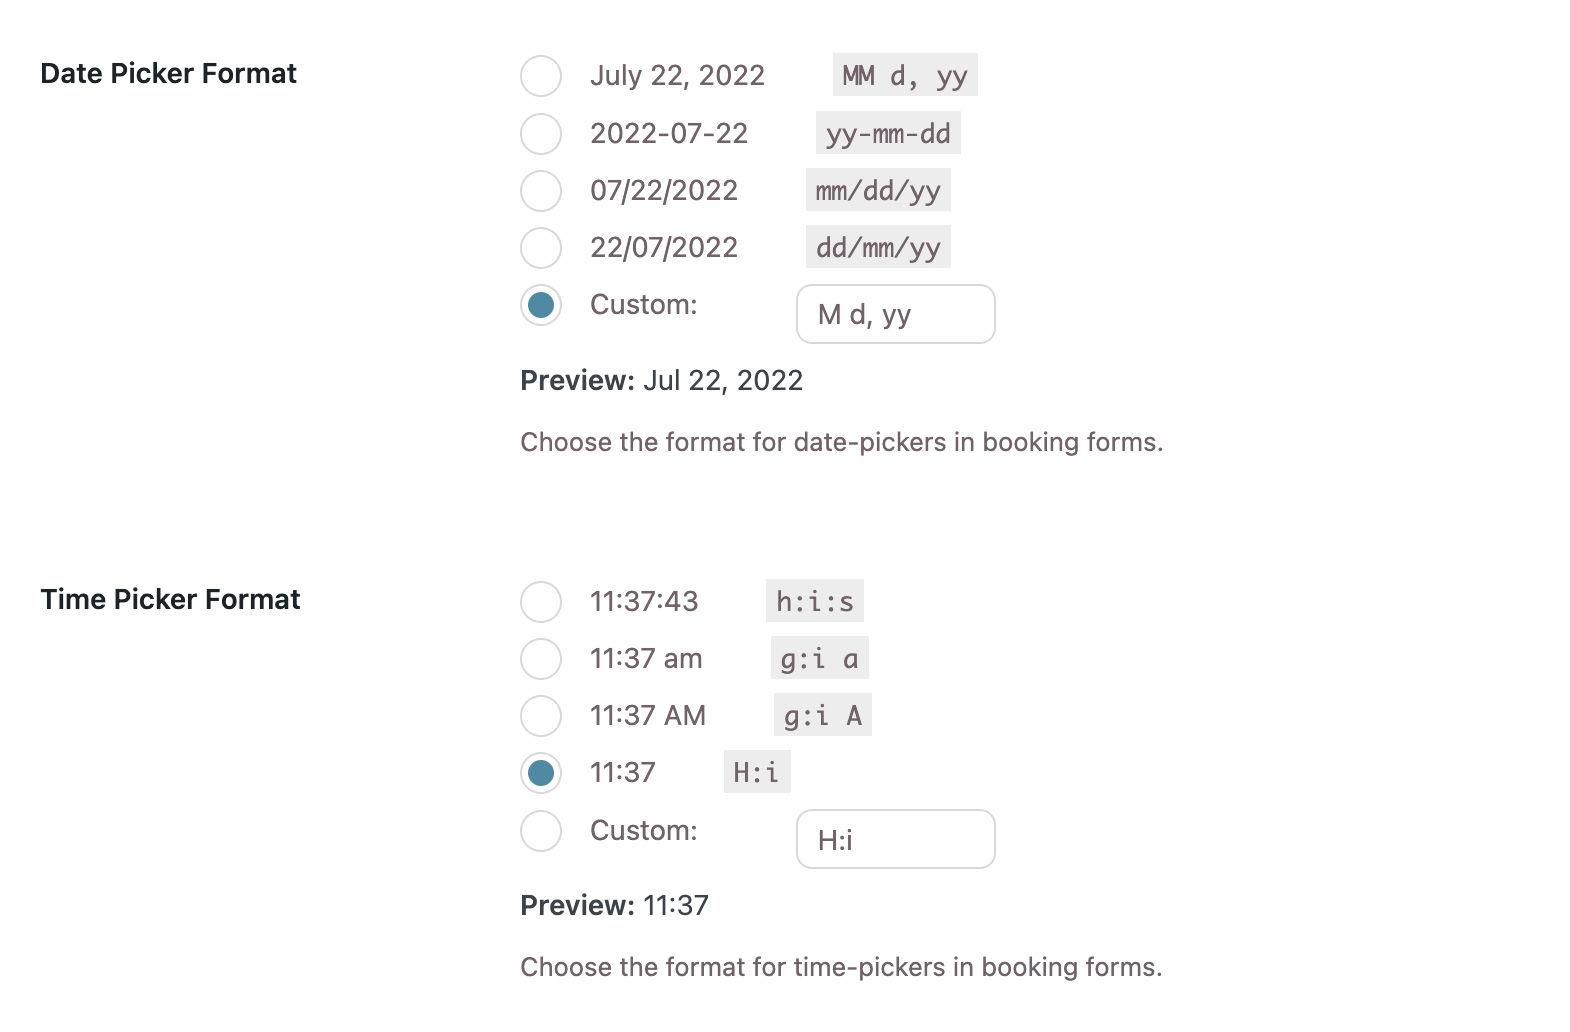

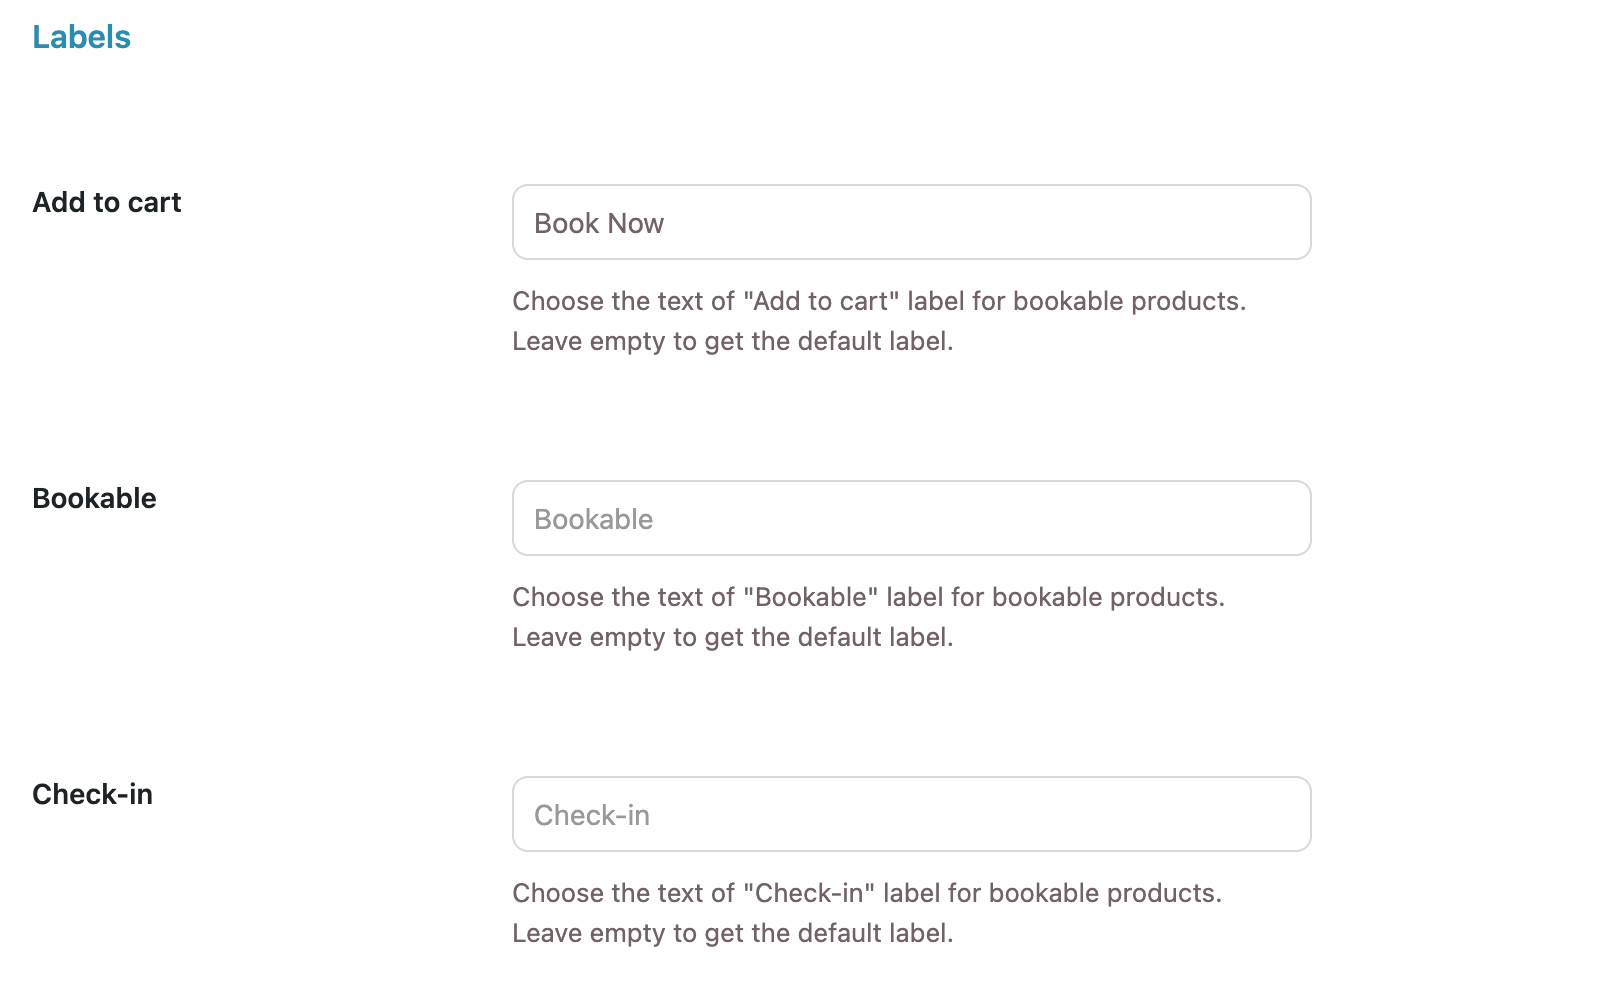
- The date and time picker format must be configured for the booking forms.
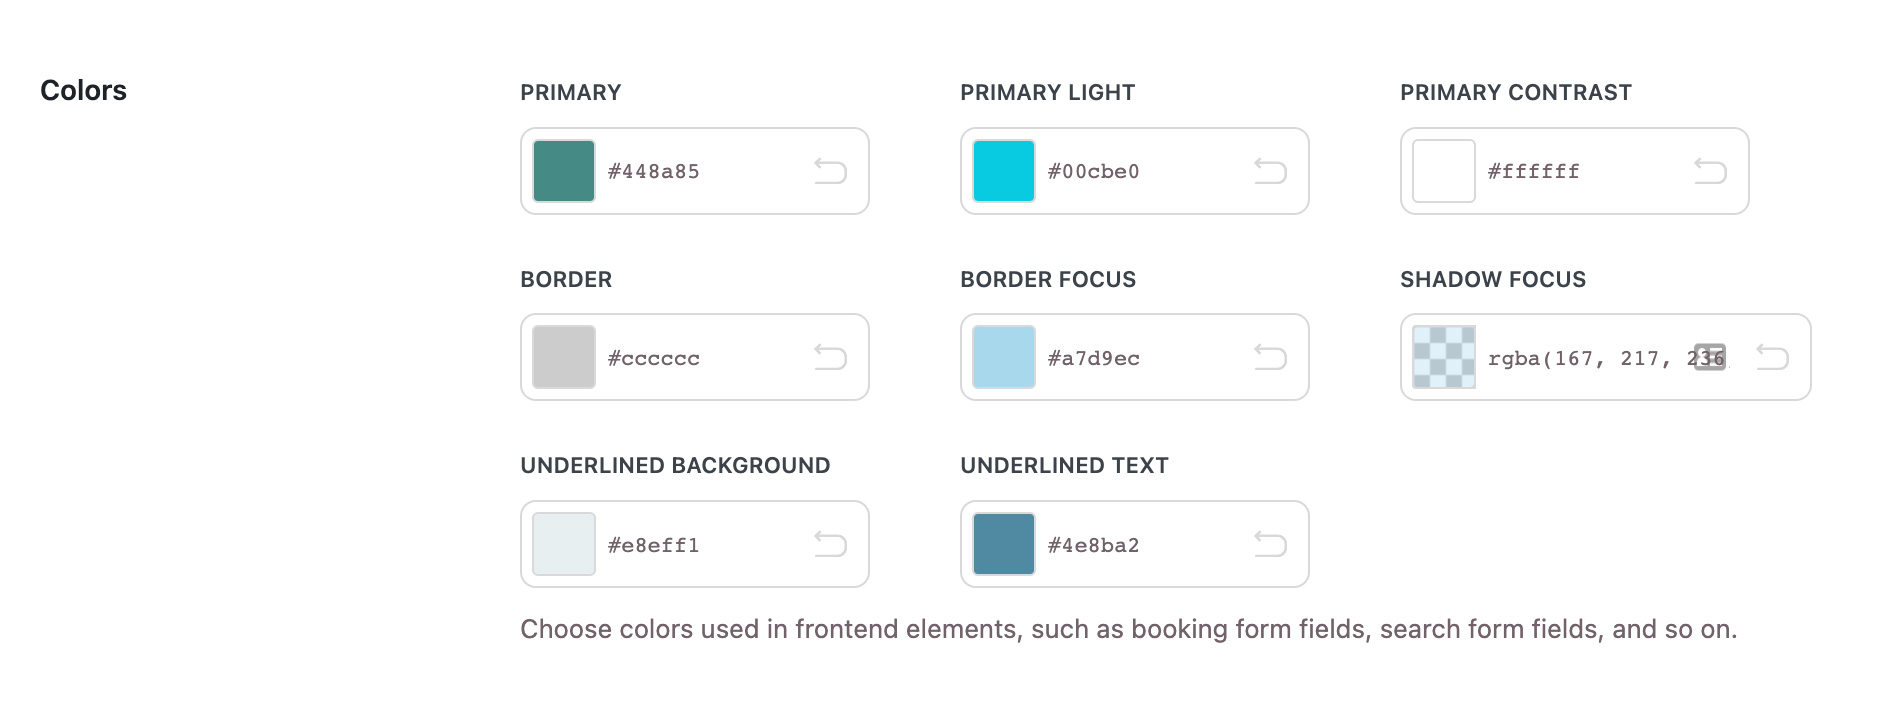
- Personalize the colors of frontend elements.
- Set the font size for the fields.
- Modify all the plugin labels (e.g., “Book Now,” “Check-in,” “Check-out,” etc.).
Availability Rules
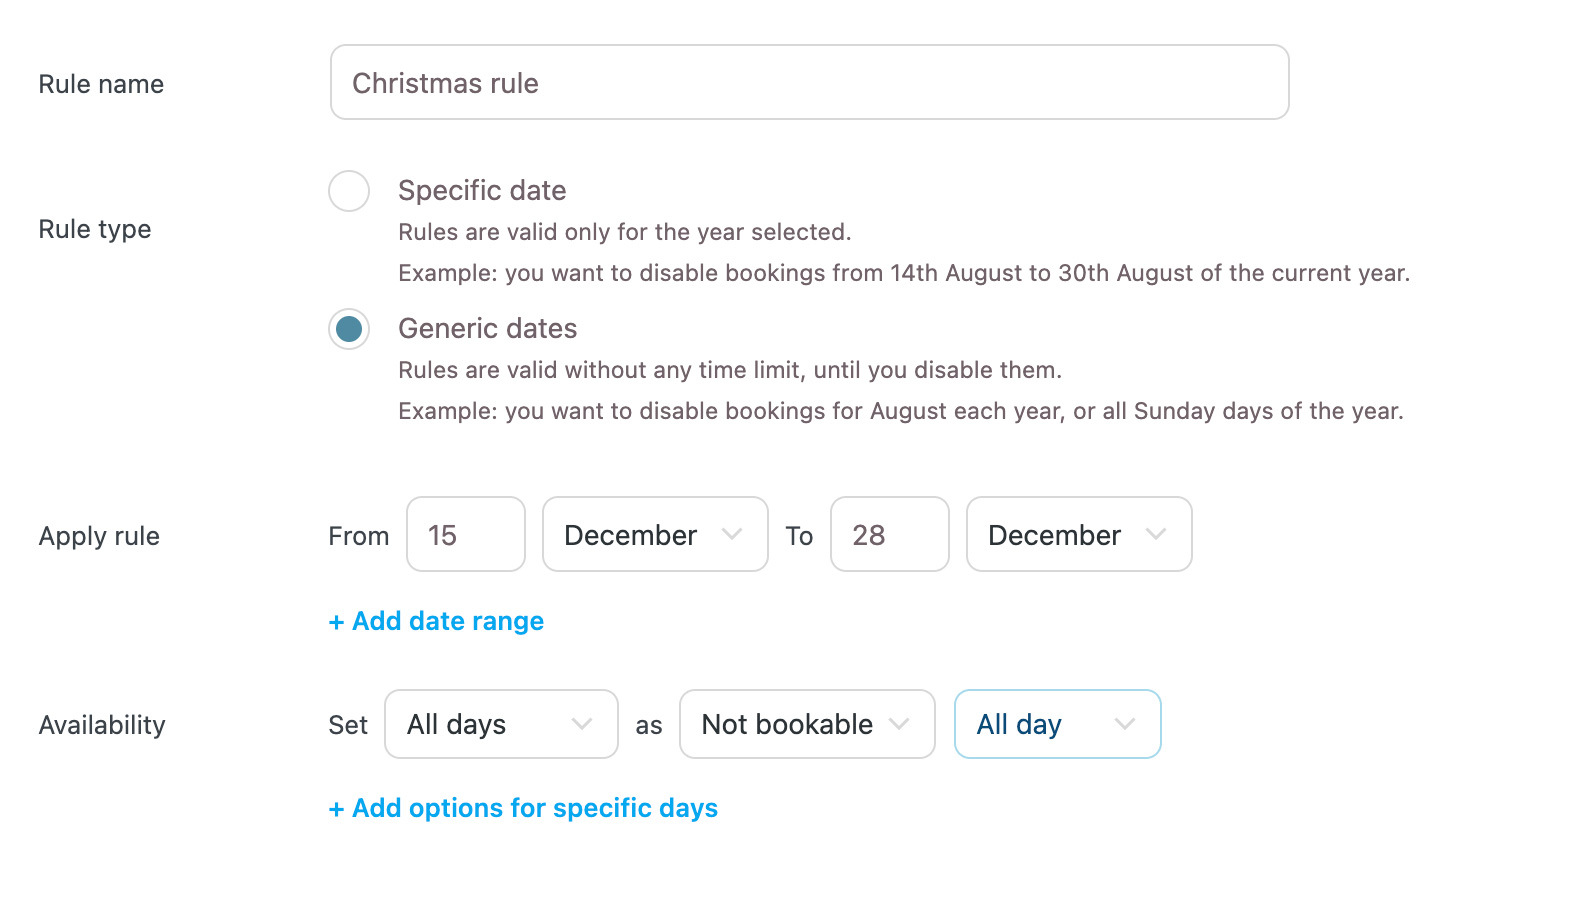
- In the Configuration > Availability Rules section, you can create global rules that apply to all your bookable products. These options are identical to those available for individual products but will be applied universally by default. For instance, you can use global availability rules to mark all products as Non-bookable on specific days (e.g., Sundays), during the Christmas holiday, or throughout the summer.
Price Rules
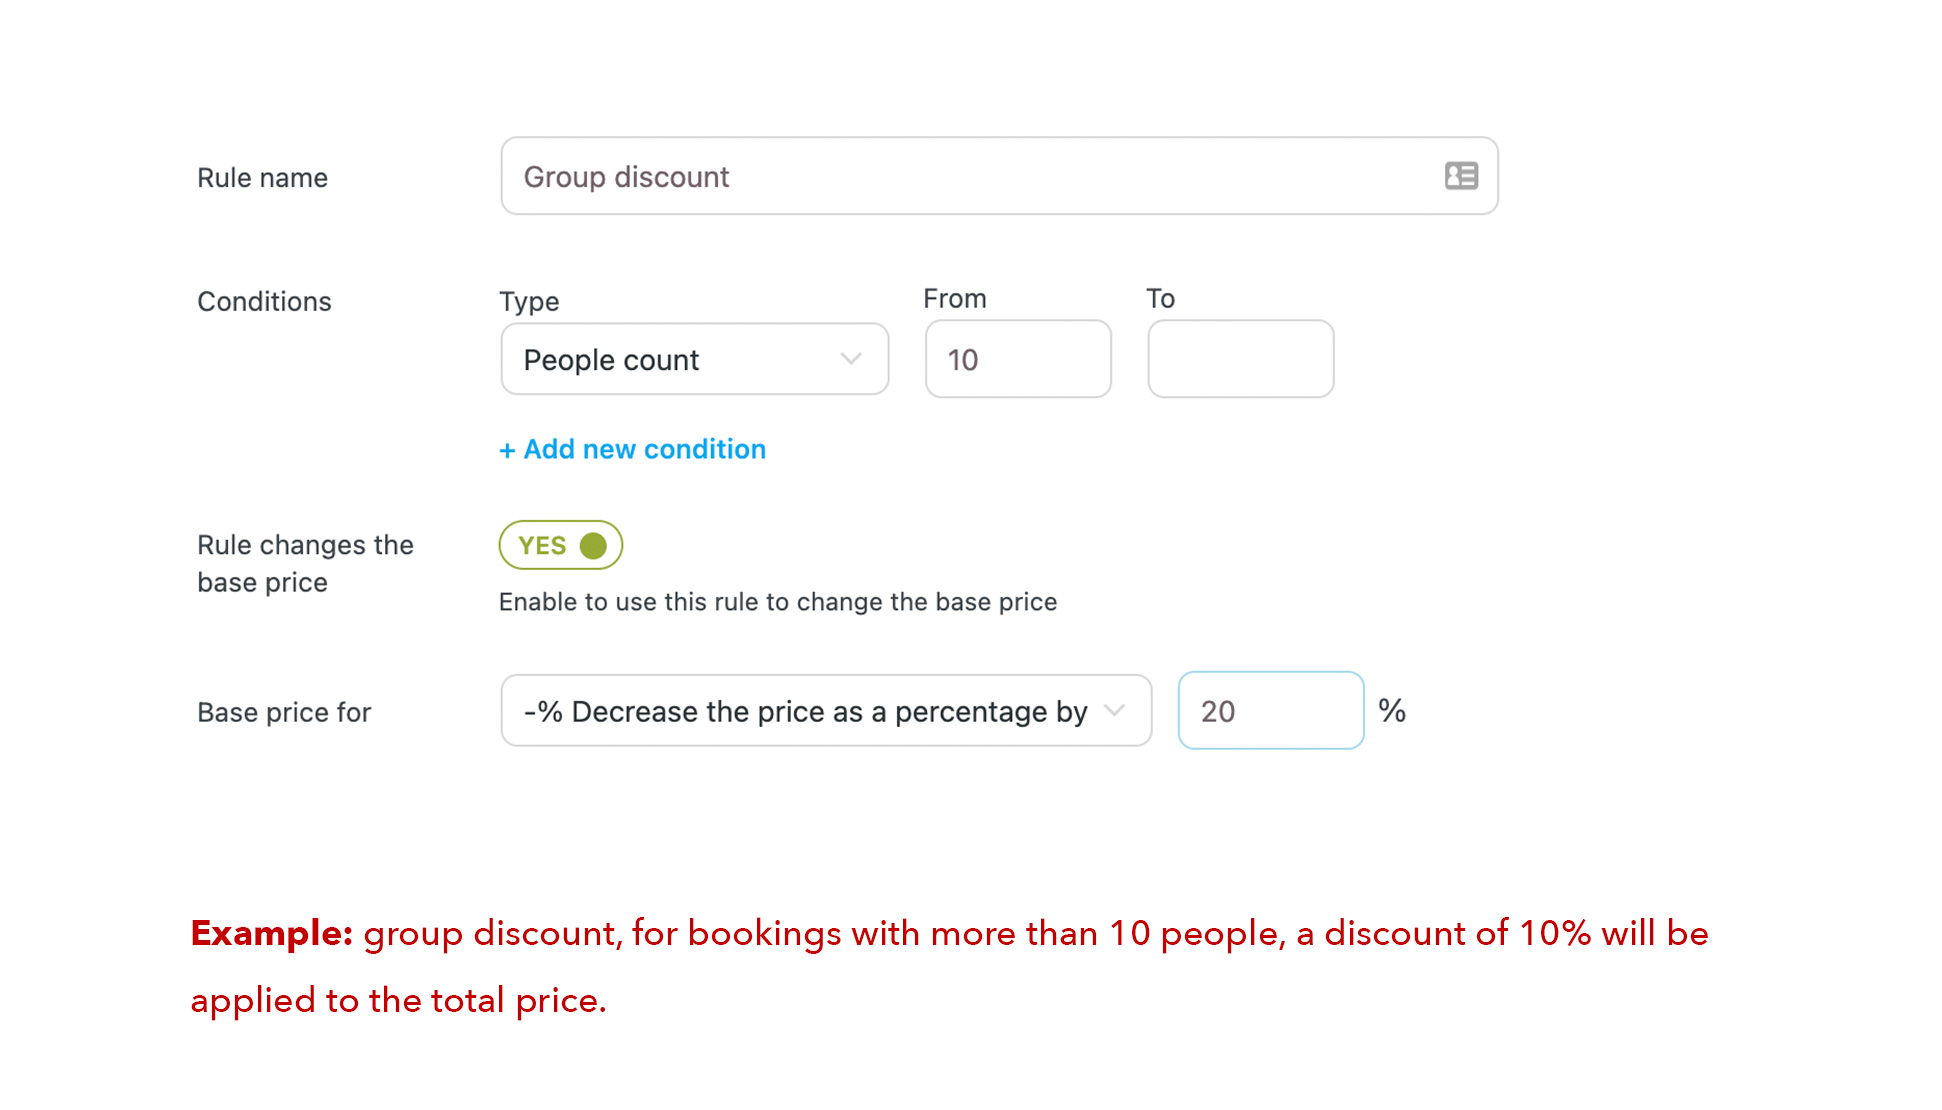
- In the Configuration > Availability Rules area, you can define global rules that apply to all your bookable products. These options are identical to those available for individual products but will be applied in general by default. You can use global availability rules to mark all products as Non-bookable on certain days, for example, Sundays or during the Christmas holiday or throughout the summer.
Summary
The Bluehost Booking and Appointment for WooCommerce is the lifeline of any business dealing with bookings and appointments. This practical guide will allow you to customize your booking system for any type of product and service, making your operations and customers much happier. You will be left to care more about quality services and not bookings.