WordPress: Enabling XML-RPC
Turning on XML-RPC on your WordPress site will allow remote connections and interactions on your site, whether you are posting content from a desktop client or through an app on your phone. This step-by-step tutorial will walk you through turning on XML-RPC within the WordPress Admin Dashboard, which will configure your site to work with the other remote publishing functionalities found within XML-RPC.
Logging into the WordPress Dashboard
-
Log in to your Bluehost Account Manager.
-
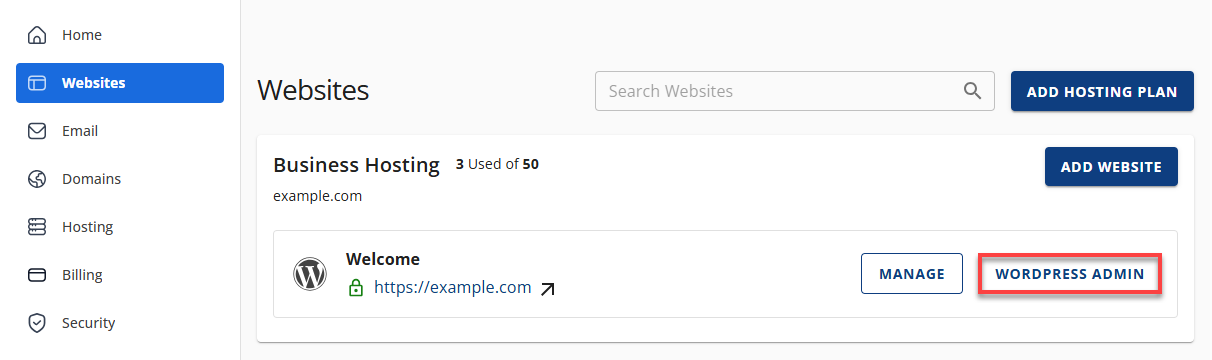
In the left-hand menu, click Websites.
-
Click the WORDPRESS ADMIN button located next to the website you want to manage.
-
Click the Settings tab, then select Writing from the sub-menu.

-
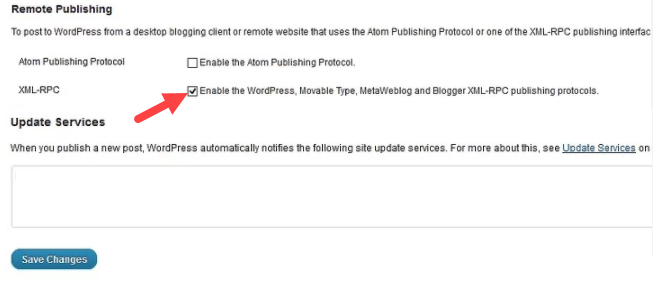
Locate the Remote Publishing section, put a check in the checkbox, and then click the Save Changes button.
 If you do not see this option in the Settings for Remote Publishing on your site, it means that Remote Publishing is enabled by default. If you do not intend to use that feature, you will first need to install a Disable XML-RPC plugin.
Pro Tip: If you want to customize or modify the XML-RPC in your dashboard, then check the article, WordPress XML-RPC. Here, you will be able to find a plugin that works for you. In order to install a WordPress plugin, see the tutorial at WordPress: Installing Plugins.
If you do not see this option in the Settings for Remote Publishing on your site, it means that Remote Publishing is enabled by default. If you do not intend to use that feature, you will first need to install a Disable XML-RPC plugin.
Pro Tip: If you want to customize or modify the XML-RPC in your dashboard, then check the article, WordPress XML-RPC. Here, you will be able to find a plugin that works for you. In order to install a WordPress plugin, see the tutorial at WordPress: Installing Plugins.
Summary
XML-RPC has made it easy to access WordPress from anywhere in the world, and enabling XML-RPC on your site is as simple as following these steps. This gives you the flexibility of being connected to your website and allows you to update your posts from anywhere remotely.